- Implementation of Product Discount Using Tags in the Checkout Page:
You can implement Product Discount Using Tags by following these steps:
-
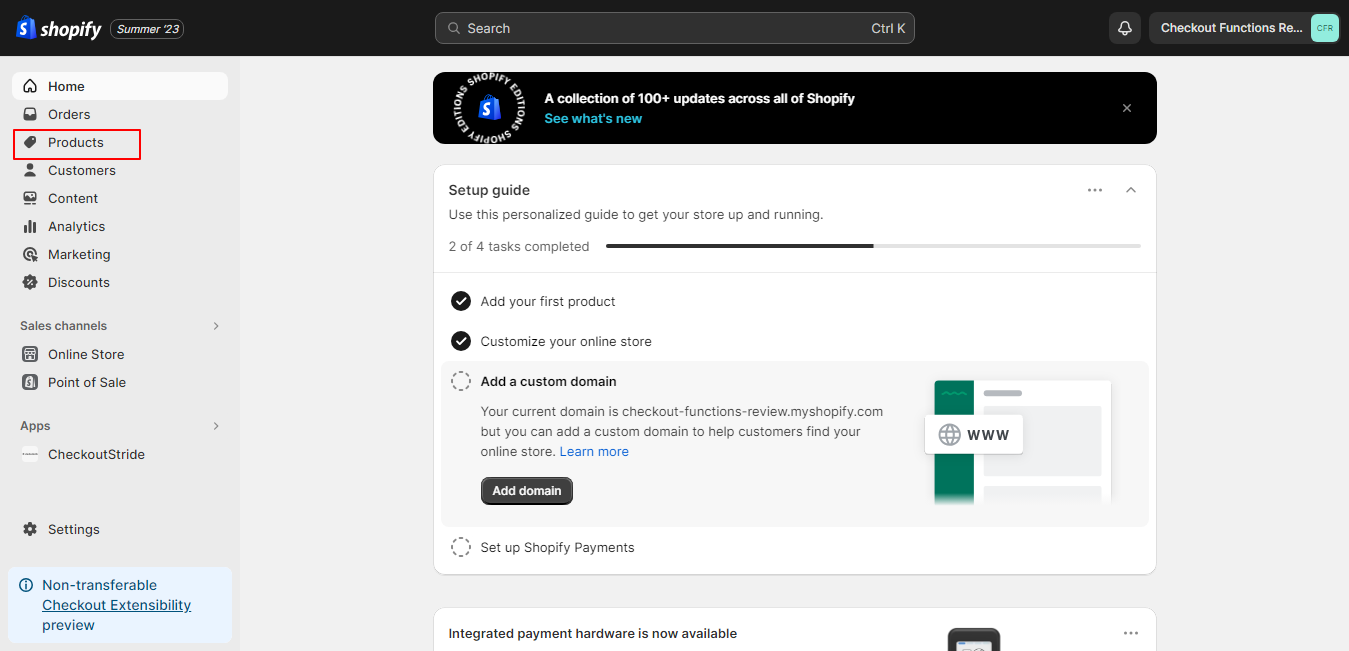
- Ensure that our app is installed on your store. To verify this, type “Checkoutstride” into your store’s search bar; it should appear in the search results.
- Upon opening our app, you will be redirected to the main dashboard. From there, click on the card labeled ‘Product Discount Using Tags,’ which is highlighted below. This will take you to the ‘Add Corresponding Discount’ screen:
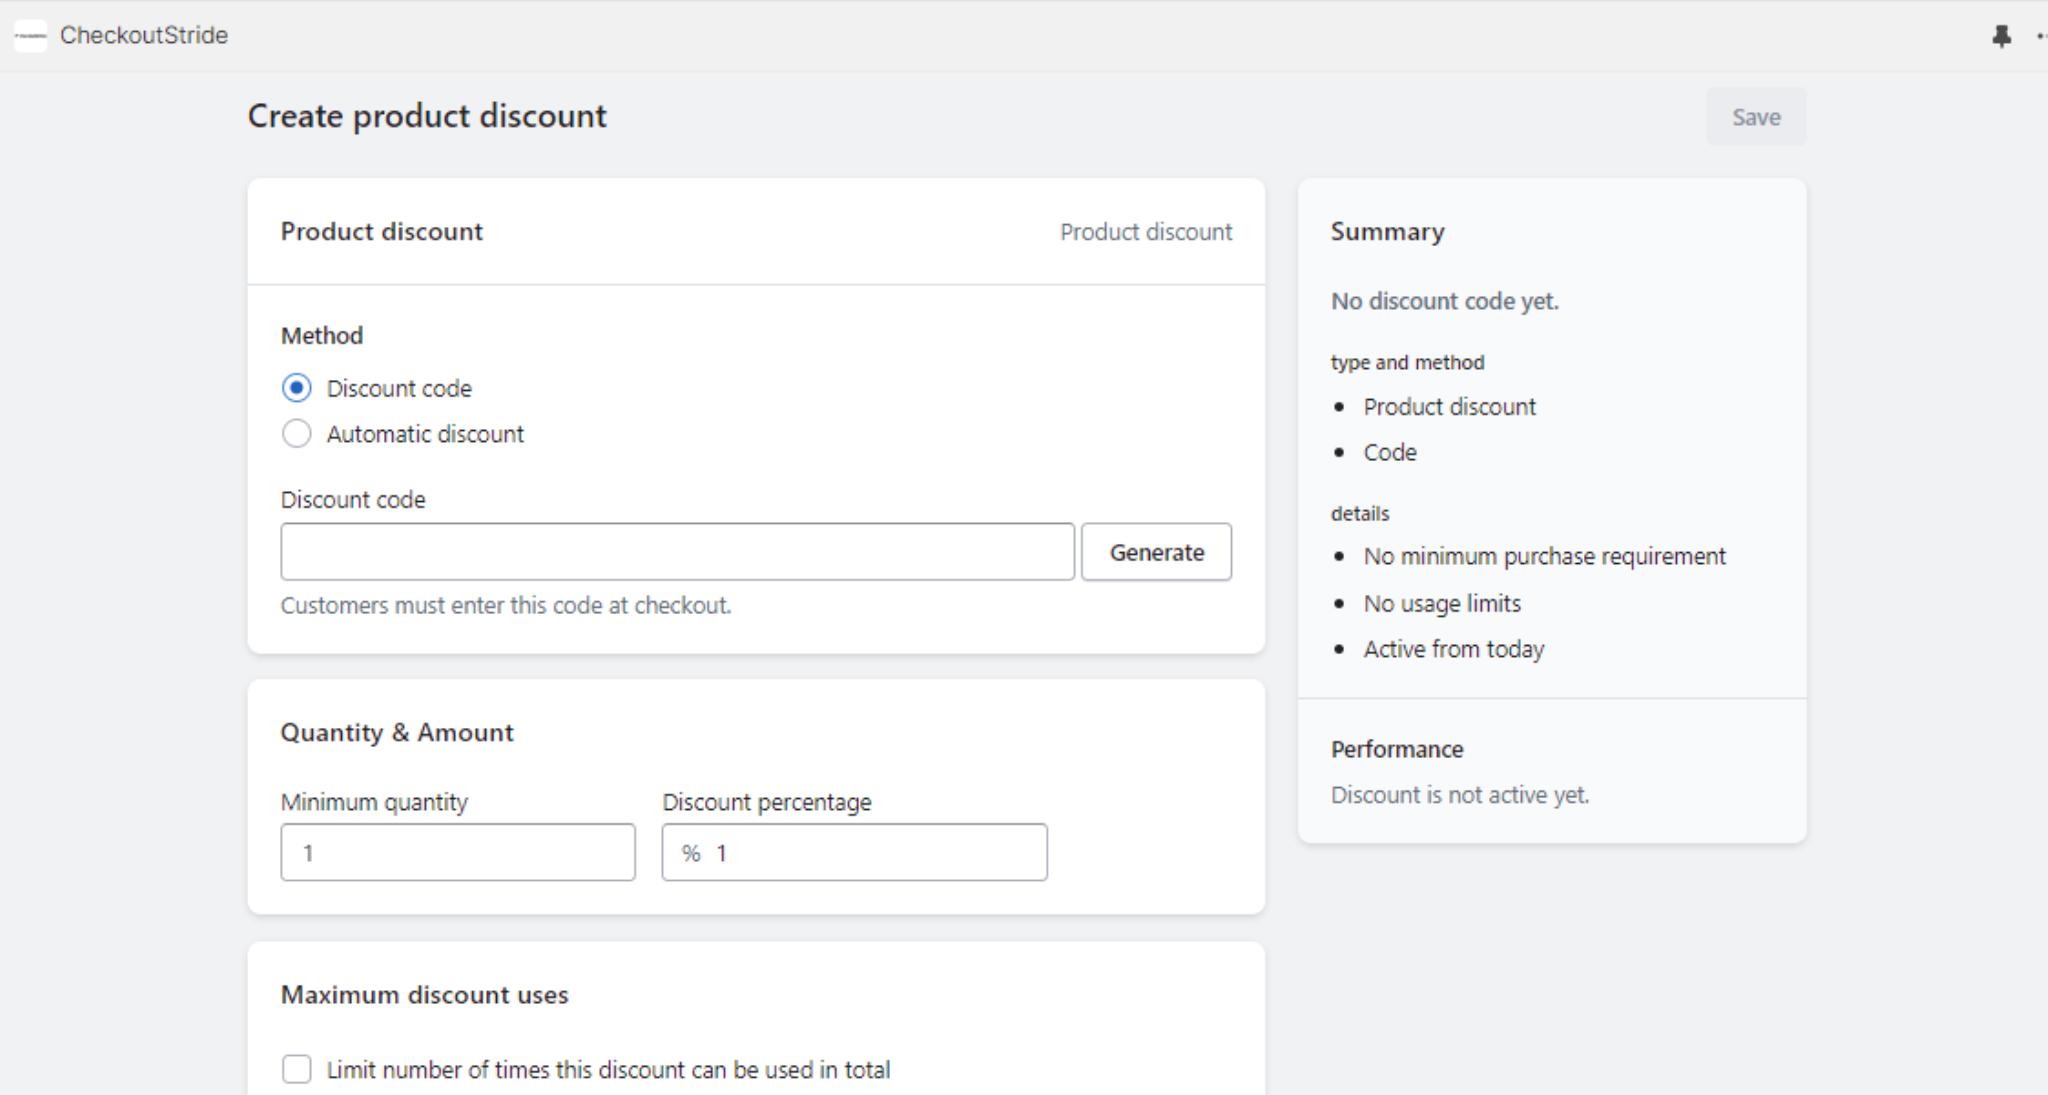
- You are now on our ‘Create Product Discount’ screen, which should resemble the following:
- At this point, you will see an empty form with fields for the title, type of discount, and specific parameters.
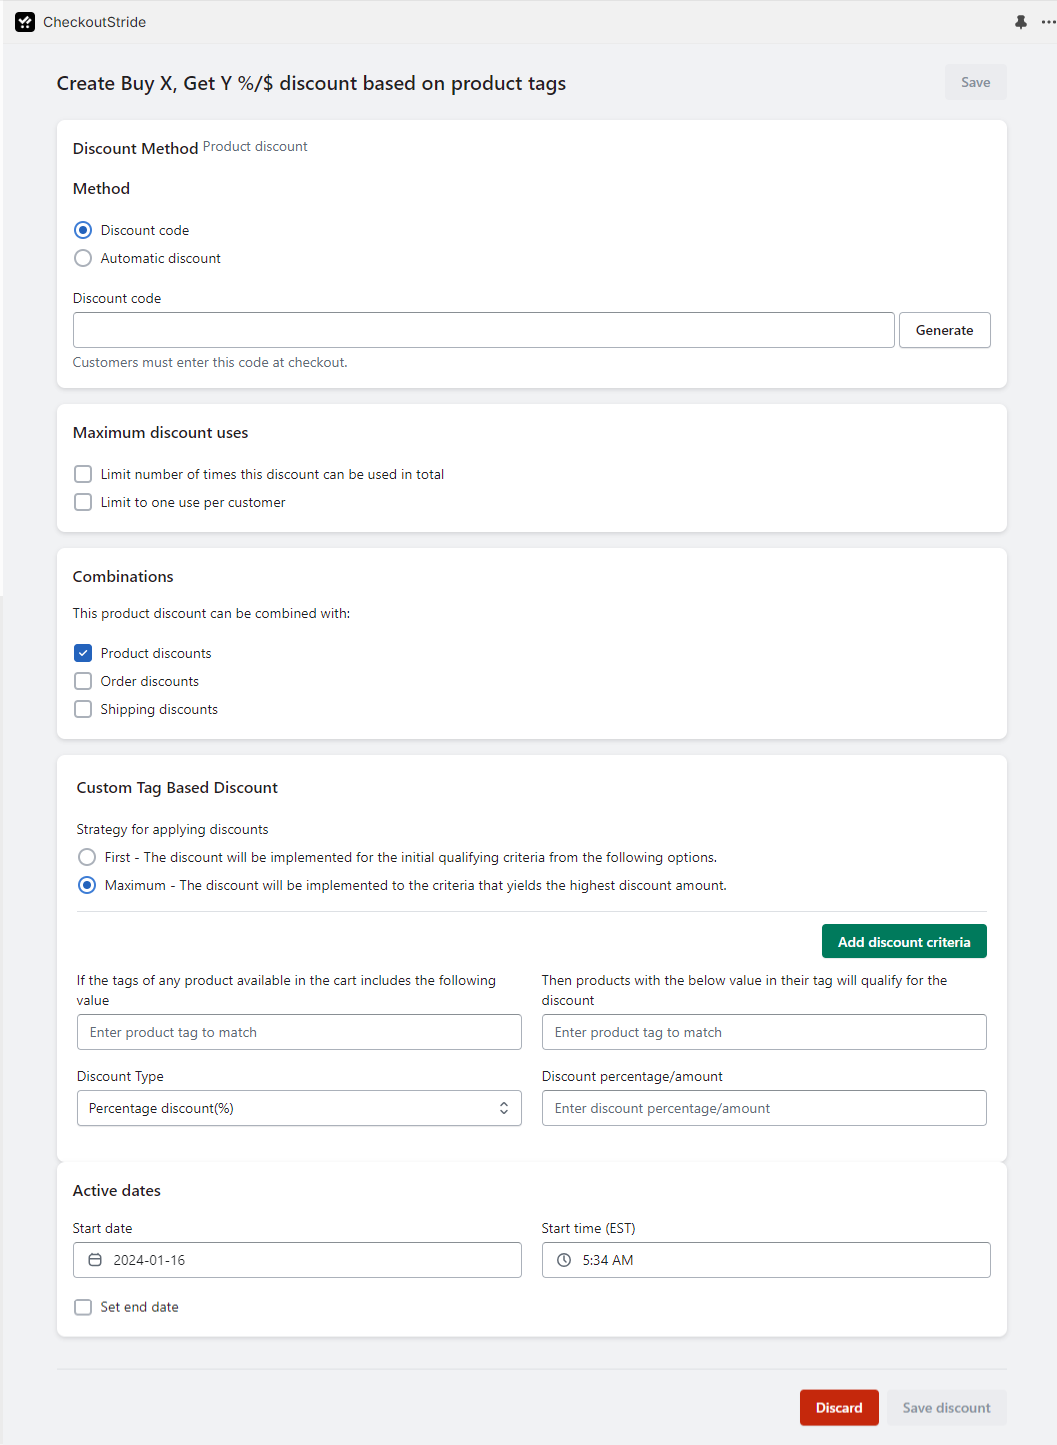
- Enter a title for the discount in the title field. This title will help you remember the discount, especially if it is an automatic one. If it’s a discount code, you can either write the code or generate one using the ‘Generate’ button.
- For discount codes, you will find two checkboxes that allow you to limit the number of times the code can be used. For example, you can specify that the code is valid for the first 500 customers only and can be used once per customer.

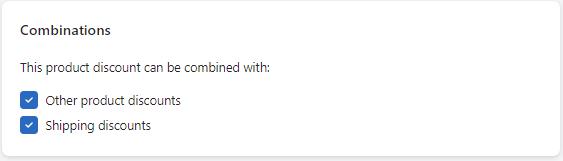
- You can combine both types of discounts with other discount options provided in checkboxes.
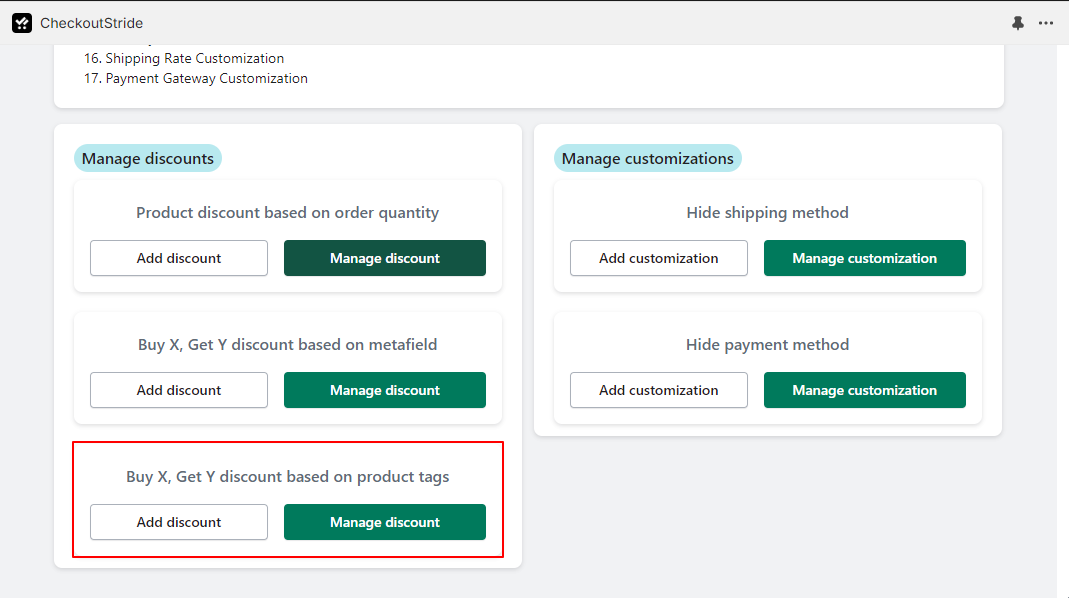
- Additionally, you will find another card labeled ‘Custom Tag-Based Discount’ where you can set the discount strategy, product eligibility tag, discount on product tags, and discount type (percentage or amount), as shown below:

- Select your desired discount strategy, whether you want to provide the first available discount or the most beneficial one for the customer.
- Enter the product tag that must be present for the discount to be eligible in the ‘Eligibility’ field. For example, if the product eligibility tag is “Mobile,” you can offer a discount on products with the tag “Mobile Accessories.”
- Next, choose the discount type from the drop-down menu, whether it’s a percentage or a fixed amount, and enter the corresponding numerical value.
- You can add up to four different conditions within a single discount.
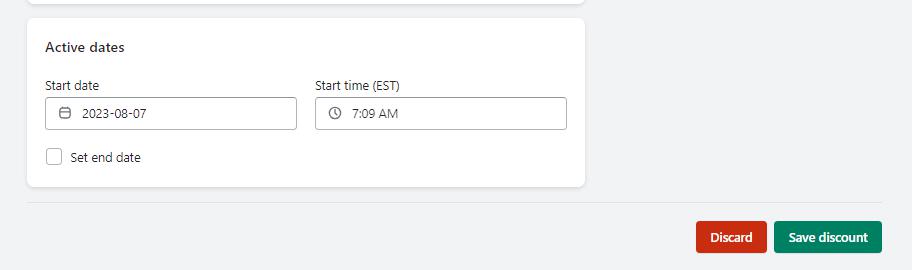
- Lastly, you can set the discount’s start date and time, as well as the end date and time, by checking the ‘Set End Date’ checkbox, as shown:
- Once you have verified the discount details, click ‘Save’ to create the discount or ‘Discard’ to cancel.
- After creating the discount, you can view the newly created active discount in the ‘Discounts’ tab in your Shopify admin. You can edit or delete this discount by clicking on the ‘Manage Discount’ button within our discount card.
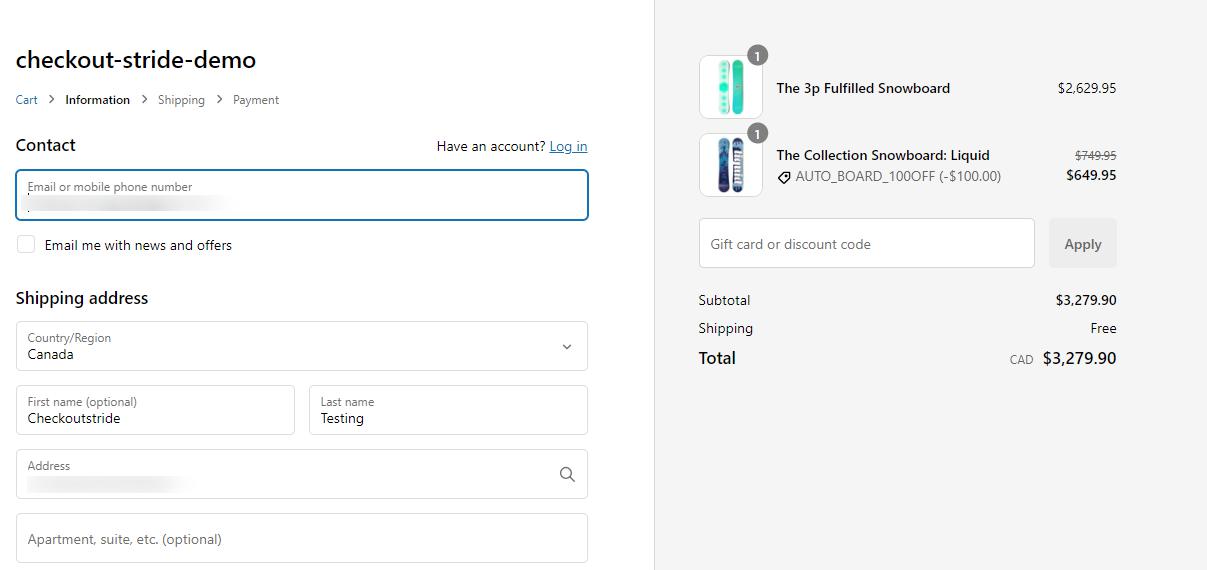
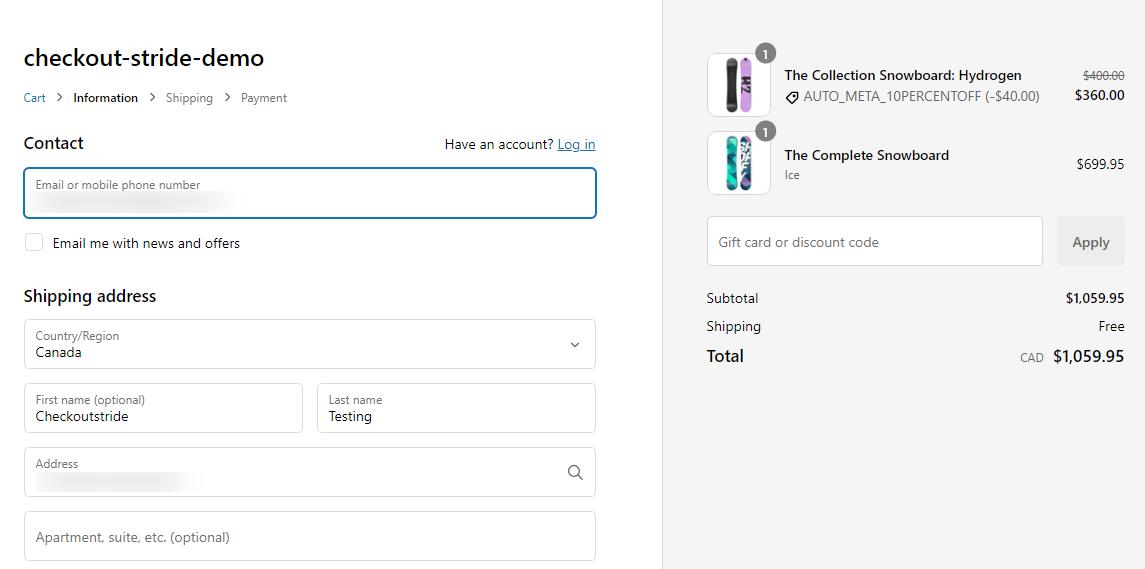
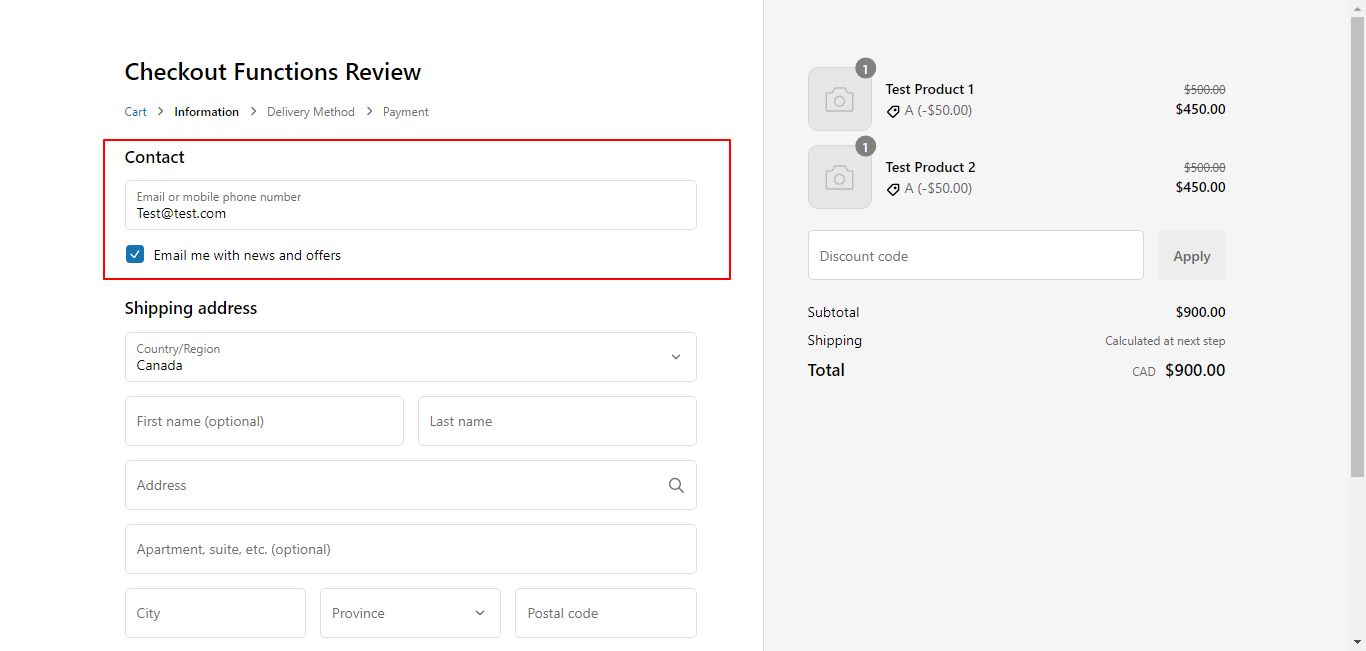
- To confirm that it is working, preview your online store, add products to your cart based on the specified conditions for your automatic or discount code, and proceed to checkout. You will observe that the discount is applied during checkout if the conditions are met. For example, we have set up an automatic discount to deduct $100 from an order if the eligible product has the tag ‘board,’ and the discount applies to products with the tag ‘Accessory,’ with a $100 discount on the order, as shown below:

- When you proceed to checkout, you will see that the discount is automatically applied when the specified conditions are met and products in your cart meet the criteria.
-
We have created a functionality for creating automatic as well as discount codes for orders based on existing cart product metafields. This feature functions similarly to product tags, but with the added flexibility of setting up more than four conditions using our app-created product metafield. You can define multiple conditions, select a strategy, and specify discount amounts or percentages with start and end dates.
- Implementation of Product Discount Using Metafield in the Checkout Page:
You can implement product discounts using metafields by following these steps:
- Ensure that our app is installed on your store. To verify, simply search for “Checkoutstride” in your search bar; it should appear in the results.
- After opening our app, you will be redirected to our main dashboard. From there, click on the card button labeled ‘Buy X, Get Y %/$ discount based on product metafield’ (highlighted below) to access the corresponding discount setup screen:

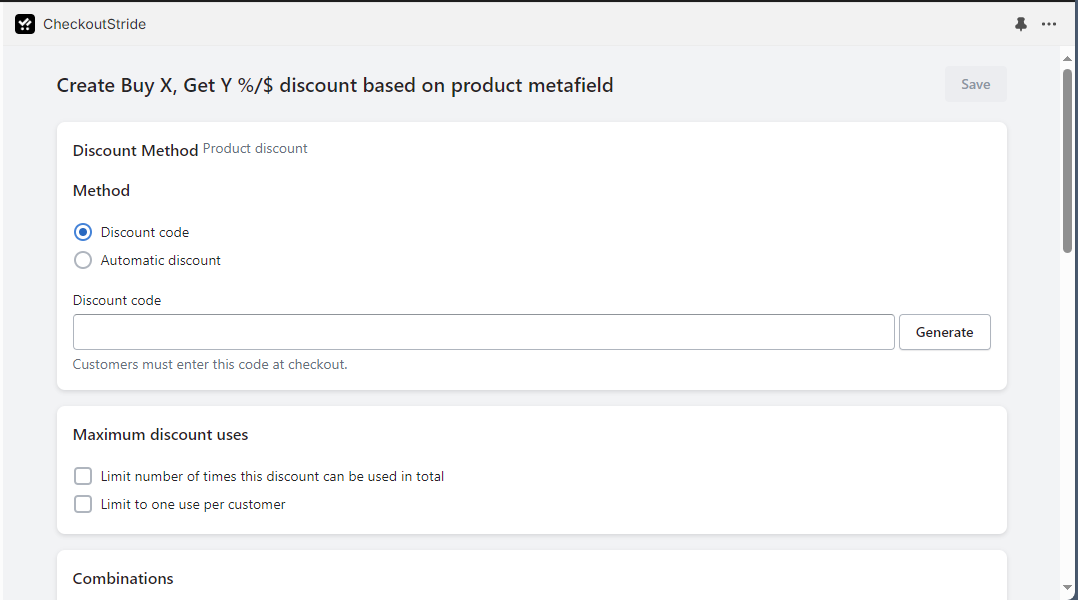
- You will now find yourself on our ‘Create Buy X, Get Y %/$ discount based on product metafield’ screen, which should resemble the following.
- At this point, you will see an empty form with fields for the title, discount type, and specific parameters.
- Enter a title that corresponds to the discount. This title is useful for identifying the discount, especially for automatic discounts. If it’s a discount code, you can either write the code or generate one using the provided button.
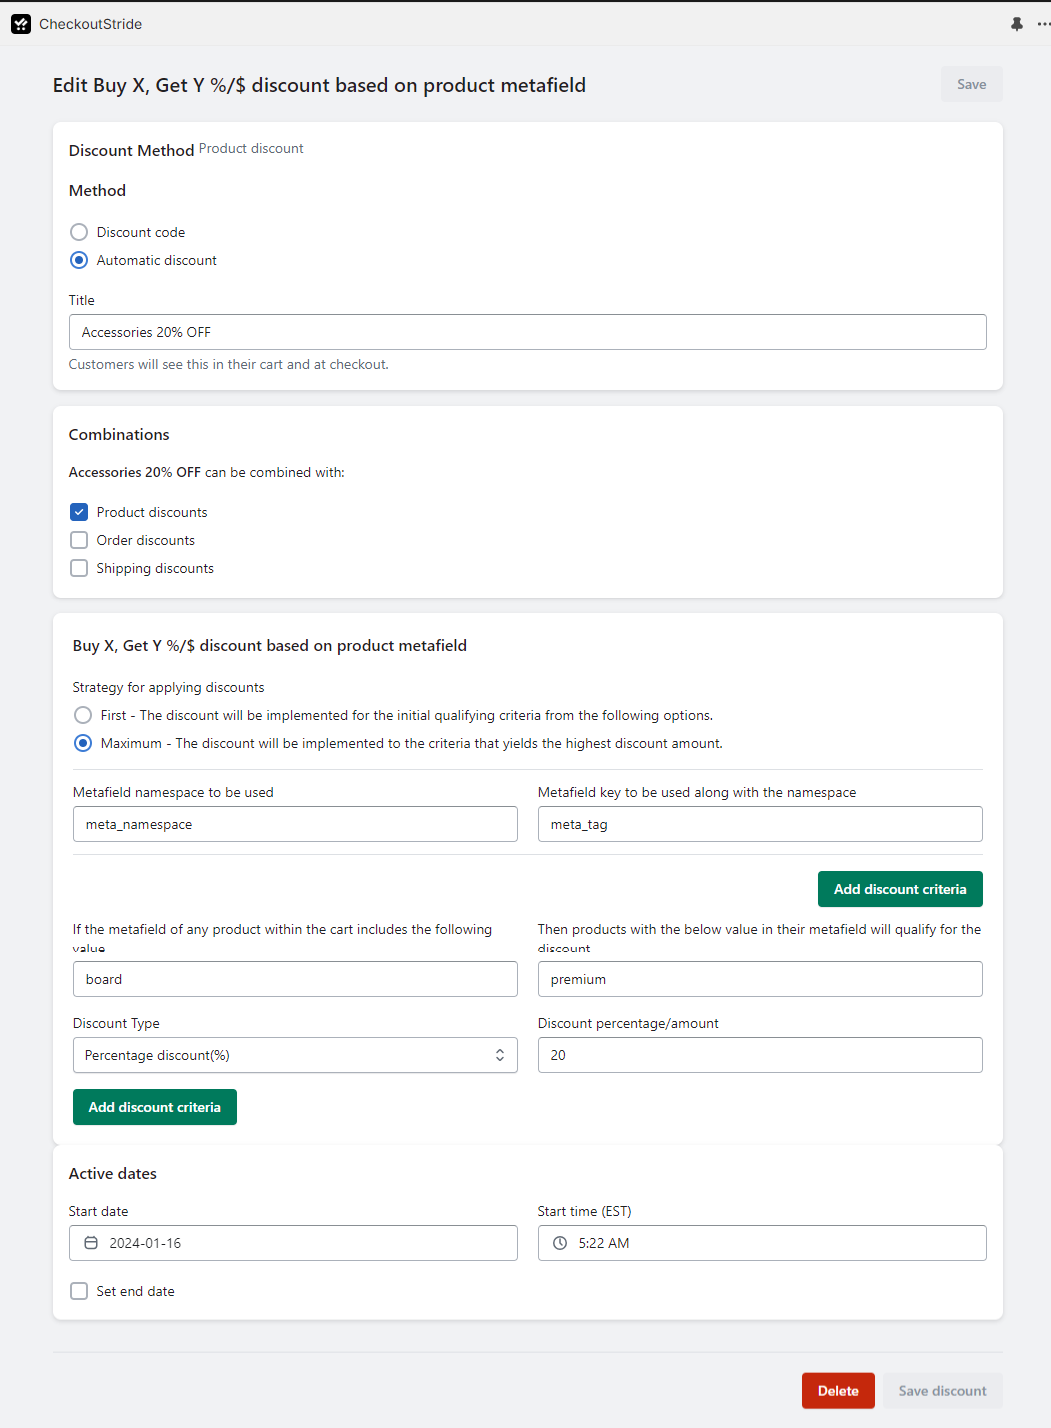
- Enter the metafield namespace and key that you’ve created and filled with custom tags for each product.
- For discount codes, you will find two checkboxes allowing you to limit the number of times the code can be used (e.g., valid for the first 500 customers only) and restrict it to one use per customer.
- You can combine both types of discounts with other available discounts by using checkboxes.
- You will also notice another card labeled ‘Buy X, Get Y %/$ discount based on product metafield’ where you can define the discount strategy, metafield namespace, and key. This involves specifying the metafield tag for product eligibility, the metafield tag for applying the discount, and the discount type (percentage or fixed amount), as shown below:
- Select your desired discount strategy—whether to provide the first available discount or the most beneficial one for the customer.
- Enter the metafield namespace and key that you’ve created and filled with custom tags for each product.
- Specify the product metafield tag that must be present for eligibility in the ‘Eligibility’ field. Then, enter the product metafield tag to which the discount will be applied. For example, if the product metafield eligible tag is “Mobile,” the discount will be applied to products with the metafield tag “Mobile Accessories.”
- Choose the discount type (percentage or fixed amount) from the dropdown menu and enter the corresponding numerical value.
- You can add multiple conditions within a single discount; there are no limitations, unlike product tag-based discounts.
- Finally, you can set the discount’s start and end dates and times by checking the ‘Set End Date’ checkbox:
- Once you’ve configured the discount to your liking, click ‘Save’ to create the discount or ‘Discard’ to cancel it.
- Once created, you can view the newly active discount in the ‘Discounts’ tab in your Shopify admin. You can edit or delete this discount by clicking on the ‘Manage Discount’ button within our discount card.
- To ensure that the discount is functioning as expected, preview your online store, add products to your cart that meet the specified conditions for your automatic or code-based discount, and proceed to checkout. You should see the discount applied during the checkout process. For example, if we’ve set up an automatic discount to apply a 10% discount to an order with the product metafield key ‘meta_tag,’ metafield
 namespace ‘meta_namespace,’ eligible product metafield tag ‘board,’ and discount application metafield tag ‘premium,’ here’s what it looks like:
 - Now, during checkout, you’ll observe that the discount is automatically applied when the cart contains products that meet the specified conditions:
- Implementing Volume Discounts in the Checkout Page:
To implement product discounts based on order quantity, please follow these steps:
- First, ensure that our app is installed on your store. You can verify this by typing “Checkoutstride” in your search bar, where it should appear in the list.
- After opening our app, you will be directed to our main dashboard. From there, click on the card button labelled ‘Product Discount Based on Order Quantity,’ highlighted below. This will take you to the corresponding discount setup screen.

- You are now on our ‘Create Product Discount’ screen, which should resemble the following:
- At this point, you will see an empty form with fields for the discount title, type, and specific parameters.
- Enter the title for your discount in the title field. This title will help you identify the discount, especially for automatic discounts. For discount codes, you can either input a code or generate one using the provided button.
- For discount codes, you will find two checkboxes that allow you to limit the number of times the code can be used (e.g., valid for the first 500 customers only and one use per customer).

- You can also combine this type of discount with other discounts by selecting the appropriate checkboxes.
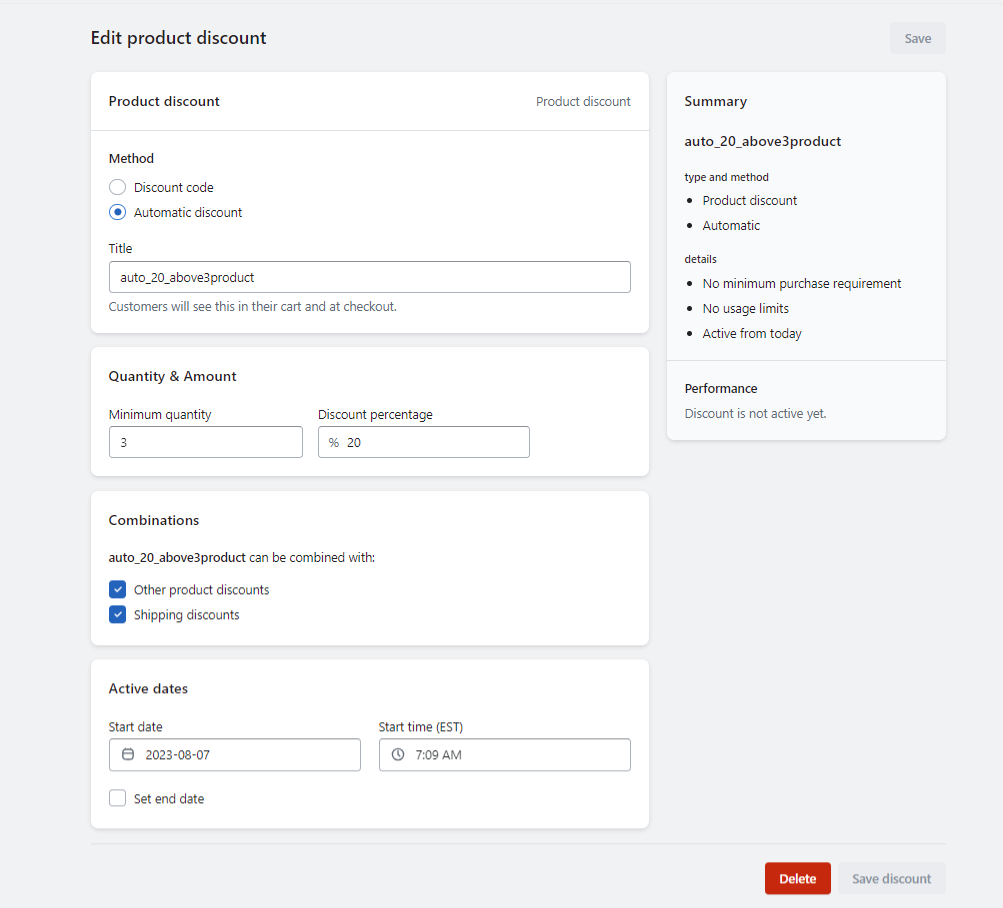
- Additionally, you will find a card labelled ‘Quantity and Amount,’ where you can specify the quantity thresholds and corresponding discount percentages in numeric form, as shown below:

- Finally, you can set the start and end dates and times for the discount, if desired, by checking the ‘Set End Date’ checkbox, as shown here:

- Before saving, you can review a summary of your entire discount setup in the top-right card. Once you’ve confirmed the details, click ‘Save’ to create the discount or ‘Discard’ to cancel.
- After creation, you can view the newly activated discount in the ‘Discounts’ tab in your Shopify admin. You can edit or delete the discount by clicking the ‘Manage Discount’ button within the discount card.
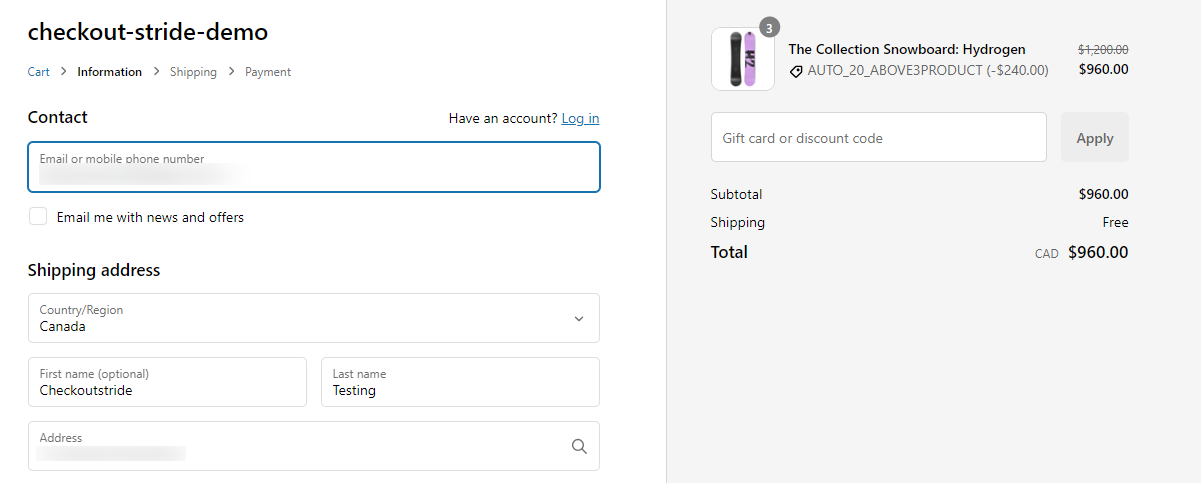
- To confirm that the discount is functioning correctly, preview your online store, add some products to your cart based on the specified conditions for your automatic or code discount, and proceed to checkout. You should see the discount applied during checkout if the conditions are met. For example, if we have set up an automatic discount to apply a 20% discount when there are more than 3 identical products in the cart, it will be displayed as shown below:
- When you proceed to checkout with more than 3 of the same products in your cart, you will notice that the discount is automatically applied:
- Implement shipping discounts on the checkout page: Achieve shipping discount functionality by adhering to the provided steps:
-
- Verify the installation of our app on your store by searching for “Checkoutstride” in your search bar; it should be listed among the results.
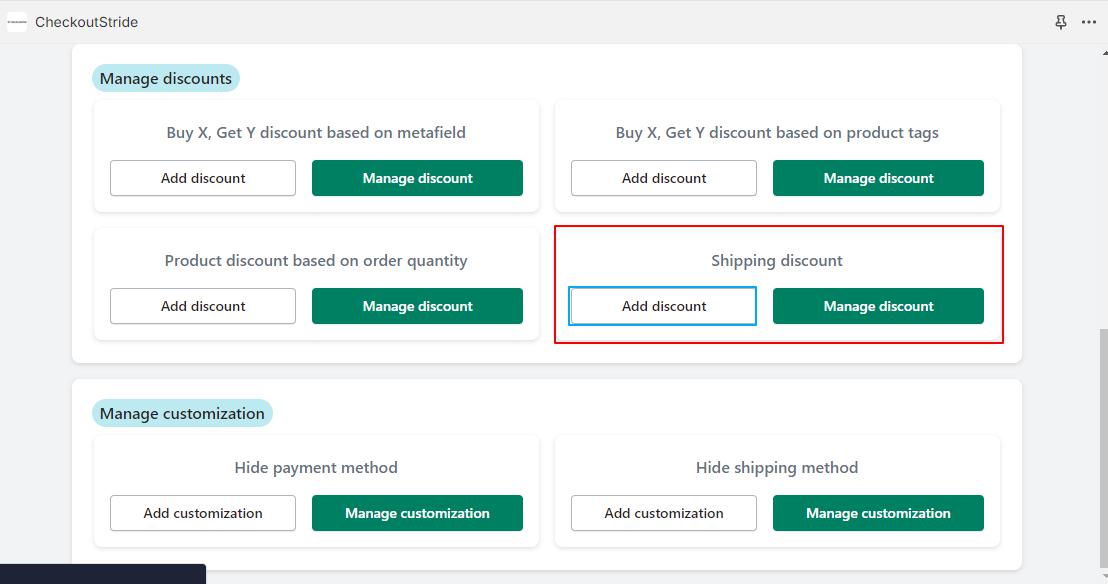
- Upon launching our app, you’ll be directed to the main dashboard. To access the ‘Shipping Discount’ feature, simply click on the corresponding card button below.
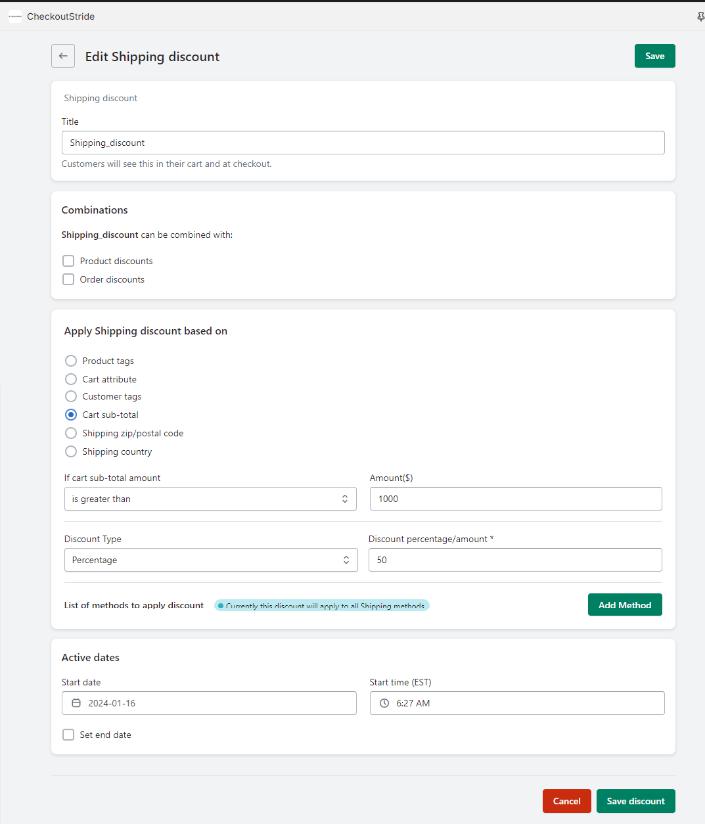
This will lead you to our screen for adding shipping discounts. - You will be able to see the Shipping Discount screen below:

- Currently, you’ll encounter an empty form displaying the title, type of discount, and its specific parameters.
- Input your corresponding title in the title field for easy recall, especially for Automatic discounts. If it’s a discount code, you’ll be prompted to either enter the code manually or generate one using the designated button.
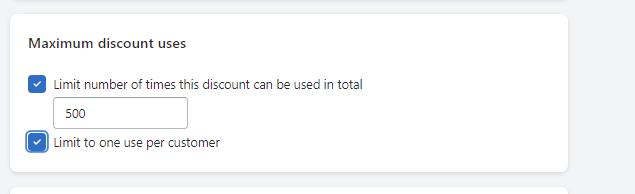
- For discount codes, two checkboxes will be available. One to limit the number of times the code can be used (e.g., valid for the first 500 customers), and the other to restrict usage to once per customer.
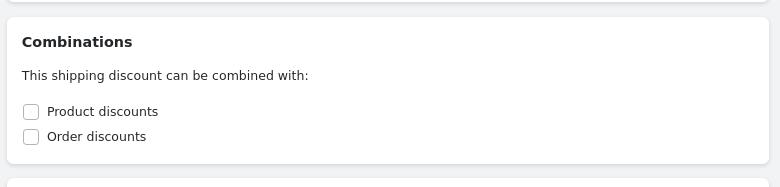
- You have the flexibility to blend both types of discounts with additional discount options, all conveniently selectable using checkboxes.
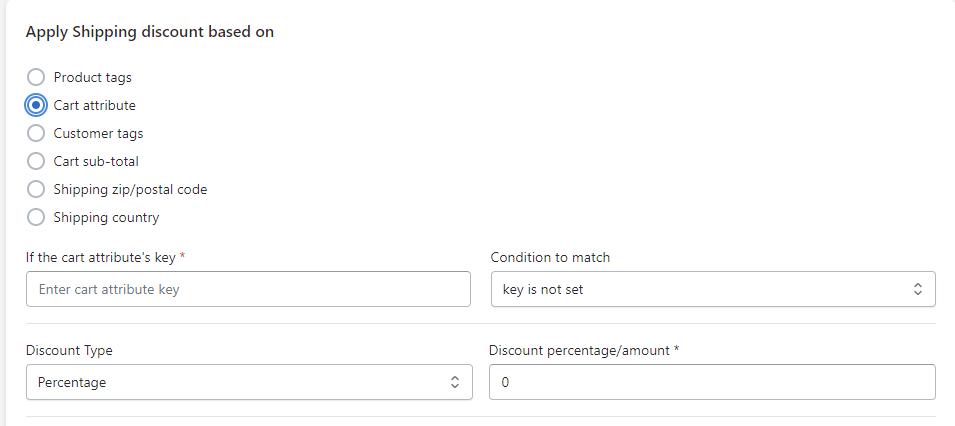
- Following are the different discount strategies
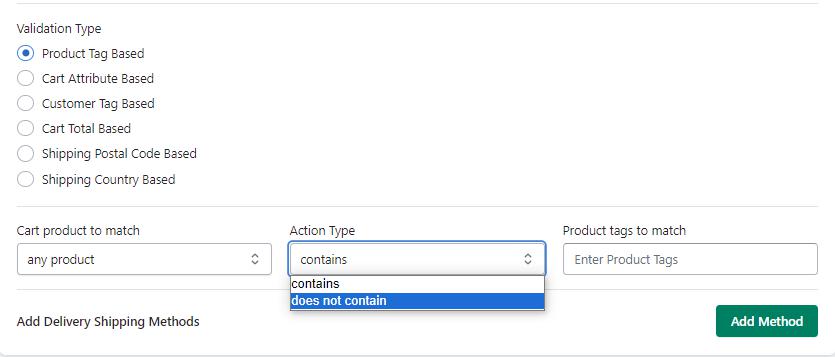
- Product tag based validation: This feature validates products based on tags to apply discounts to the selected shipping method. The system analyzes the tags associated with products in the customer’s cart, parsing through each one to determine whether to show or hide the shipping method. Conditions such as requiring the tag to be present in all products or any one of them, as well as specifying whether it must contain or not contain certain tags, can be configured. Please enter the relevant product tags in the provided field as highlighted in the image.

- Cart Attribute Based Validation: This feature enables the application of discounts to specified shipping methods based on cart attributes present in the customer’s cart. The system parses through each cart attribute, determining whether to apply a discount to the corresponding shipping methods.
To configure this, fill in the cart attribute key and its specific action type. Specify the condition, such as “not set,” “not equal to,” “equal to,” “set but not equal to,” etc. Additionally, provide the attribute value when using conditions like “equal to,” “not set not equal to,” or “set and not equal to,” as illustrated in the image below:
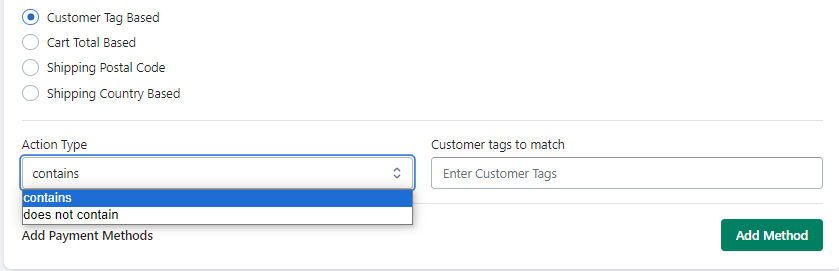
- Customer Tag Based: This feature enables the application of discounts to a specified shipping method based on the current customer’s tags found in their details. The system will analyze each tag and determine whether to apply a discount to the designated shipping method. To configure, fill in the corresponding tags, specify the action type (contains or does not contain), and provide the matching tag as illustrated in the image below.

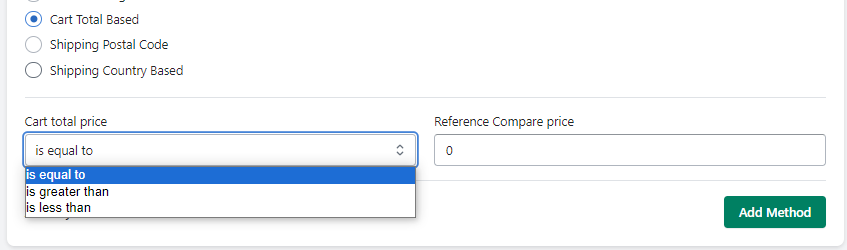
- Cart Total Based: Apply a discount to the selected shipping method based on the current customer’s cart total. The system will calculate and determine whether to apply the discount based on specific conditions such as comparing the cart total to a given price. Refer to the image below for the corresponding compare price and its specific condition type (equal to, greater than, or less than).
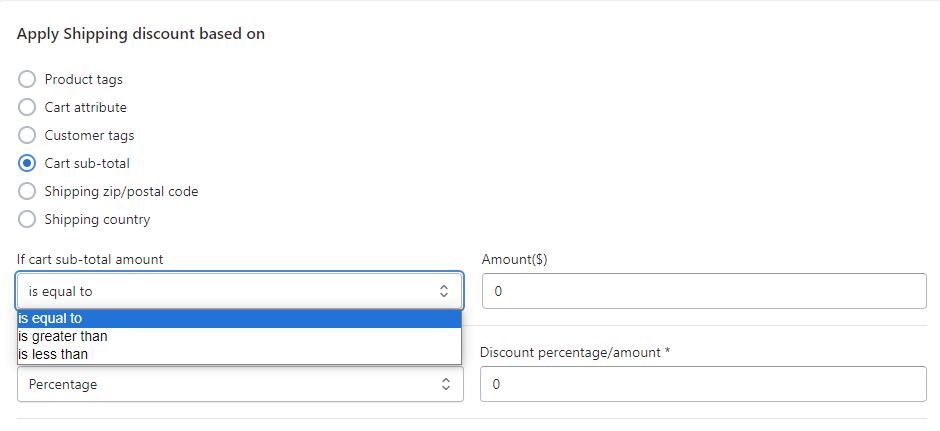
- Shipping Postal Code Based: Apply a discount to the selected shipping method based on the current customer’s cart total. The system will calculate and assess whether to apply a discount based on specified conditions, such as comparing the cart total to a given price as illustrated in the image below.

- Shipping Country Based: This feature applies discounts to the selected shipping method based on the customer’s current country code found in their shipping details. The system parses the country codes, checks for corresponding matches in a checkbox list, and determines whether to apply the discount based on specified action types, such as containment or non-containment, as illustrated in the image below.


- Product tag based validation: This feature validates products based on tags to apply discounts to the selected shipping method. The system analyzes the tags associated with products in the customer’s cart, parsing through each one to determine whether to show or hide the shipping method. Conditions such as requiring the tag to be present in all products or any one of them, as well as specifying whether it must contain or not contain certain tags, can be configured. Please enter the relevant product tags in the provided field as highlighted in the image.
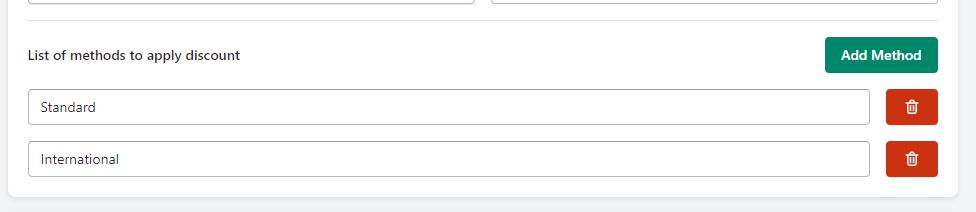
- Easily apply discounts to specific shipping methods by entering their names in the “Add Method” text field. Be precise with the method name to ensure accurate comparison. If no name is specified, discounts will apply to all available shipping methods during checkout. Save the entered name to activate the shipping discount.
- After creation, view your recently activated discount in the “Discounts” tab within your Shopify admin. You can edit or delete this discount at any time by clicking the “Manage Discount” button on the discount card.
- Ensure functionality by testing your online store. Add products to your cart based on the specified conditions set by your automated/code discount. Proceed to checkout, and you’ll observe the applied discount if the conditions are met. For instance, a predefined automatic discount offers a 50% reduction on all shipping methods when the cart total exceeds $1000, as illustrated below:
- If your cart total exceeds $1000 during checkout, you’ll notice an automatic discount applied to the shipping methods.

- Verify the installation of our app on your store by searching for “Checkoutstride” in your search bar; it should be listed among the results.
-
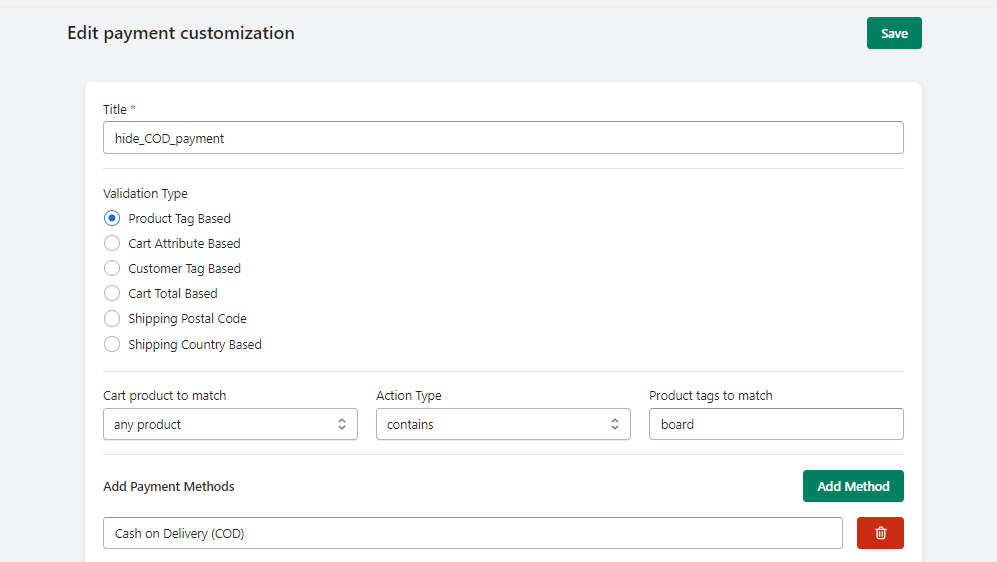
- Hide payment method implementation in checkout page:
To implement payment customisation, please follow these steps:
- First and foremost, ensure that our app is installed on your store. To verify this, type “Checkoutstride” in your search bar, and it should appear in the search results.
- After opening our app, you will be redirected to our main dashboard. From there, click on the card button labelled ‘Hide payment method,’ highlighted below. This will take you to our payment customisation screen::

- You are now on our payment customisation screen, which should resemble the following:
- At this point, you’ll see an empty form titled ‘Various Types and Payment Methods to Add.’
- Enter your corresponding title in the ‘Title’ field to help you remember this customisation.
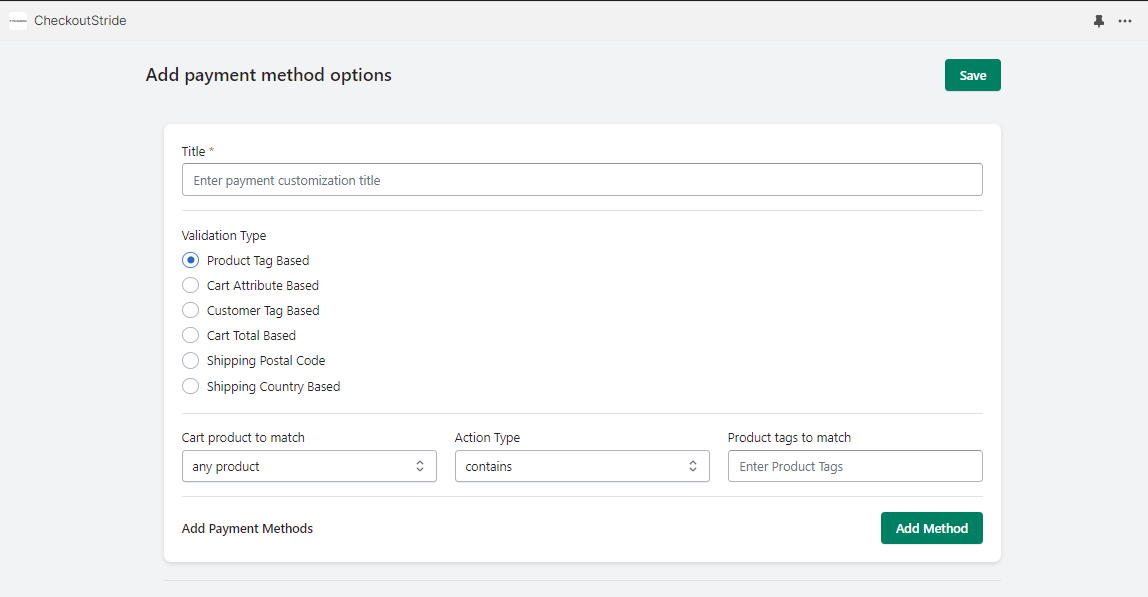
- Select the type of validation you wish to apply. There are multiple validation types to choose from, such as:
- Product cart-based validation:
This validation method conceals a specified payment option depending on the tags found in a customer’s cart items. It scrutinises each product in the cart and decides whether to display or hide the payment method accordingly. You will need to specify conditions such as whether the tag must be present in all products or just one of them, as well as whether it must be present or not present, as illustrated in the provided image.:

Additionally, enter the product tags you wish to match in the designated “Tags” field. - Cart attribute-based validation:
This validation method involves concealing the designated payment method based on cart attributes within the customer’s cart. It scrutinises each of these attributes and decides whether to display or hide the payment option. To set this up, you’ll need to provide the cart attribute key and specify its particular action type, such as “not set,” “not equal to,” “equal to,” “set but not equal to,” etc. Additionally, if you’re using conditions like “equal to” or “set and not equal to,” you must also enter the corresponding attribute value, as illustrated in the image below.

- Customer tag based:
This validation method hides the designated payment option based on the tags associated with the current customer’s details. It evaluates each of these tags and decides whether to display or hide the payment method accordingly. To implement this, you must input the corresponding tags in the provided field and specify the desired action type, such as “contains” or “does not contain,” as illustrated in the image below. Be sure to also enter the corresponding tag to be matched.
- Cart total based:
This hides the selected payment method based on the current customer’s cart’s overall total. It calculates the total and determines whether to show or hide the payment method. Specify the compared price and its specific condition type (e.g., equal to, greater than, less than the given price), as shown in the image below:
- Shipping postal code based:
This method conceals the specified payment option based on the current customer’s postal code, which is part of their shipping details. It processes these postal codes and decides whether to display or hide the payment method. To implement this, you must provide the relevant postal codes to be matched and specify the desired action type, such as “contains” or “does not contain,” as depicted in the image below.

- Shipping Country Based:
This method involves hiding a specific payment option based on the current customer’s country code, which is part of their shipping details. It analyses these country codes and determines whether to display or conceal the payment method. To implement this, you need to verify and select the corresponding country codes from the checkbox list and specify the desired action type, such as “contains” or “does not contain,” as demonstrated in the image below.

- Product cart-based validation:
- Now, you only need to enter the names of the payment methods you want to disable, such as third-party payment providers or manual payment providers. Be precise when entering the payment method name as it will be compared exactly. To avoid errors, refer to your Shopify admin -> Settings -> Payment screen, as shown below.
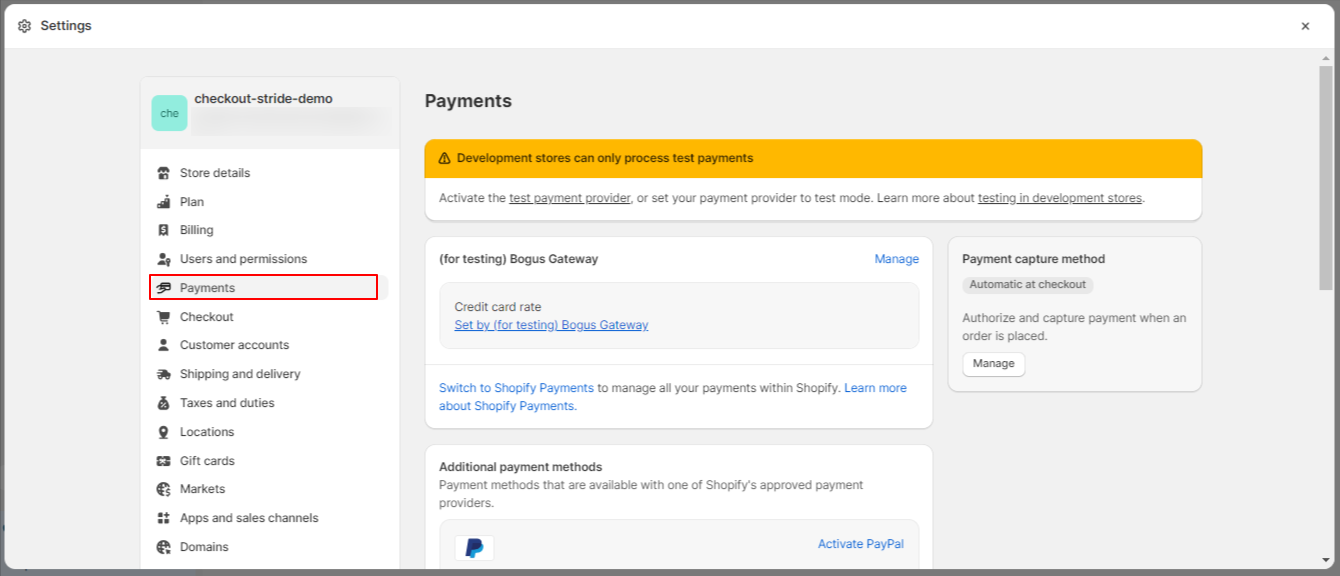
Copy the payment method name from the payment method, as indicated in the image below:

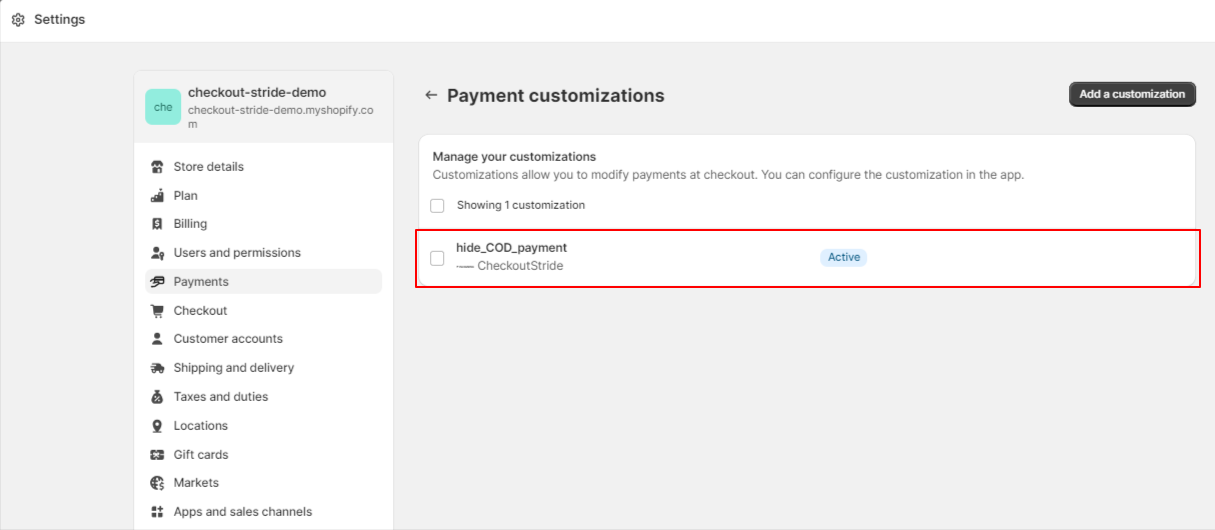
Paste this name into the ‘Add Method’ text field and save it to enable this payment customisation. You can check the status of your payment customisation by clicking on the ‘Manage Payment’ button in the ‘Hide Payment Method’ card. It will look something like this:Here, you can see your newly created active payment customisation. You can edit, delete, or deactivate it as needed.
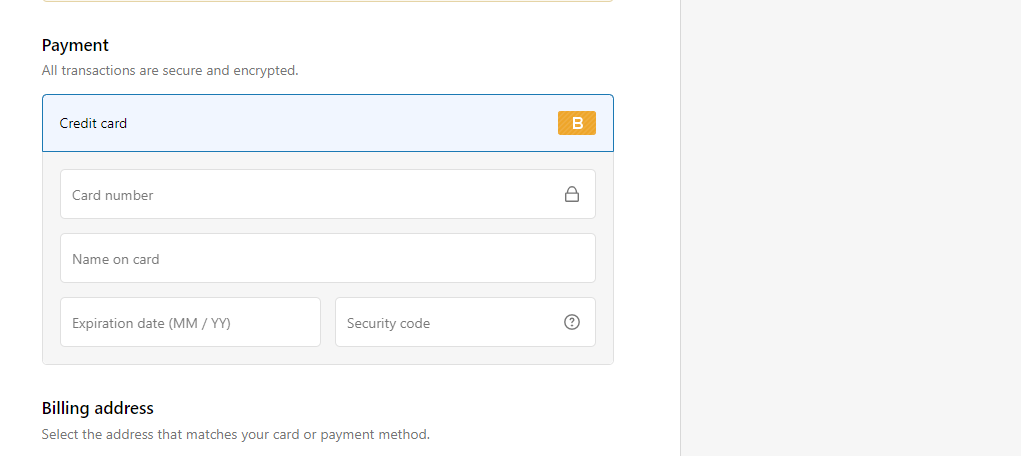
- To confirm that your customisation is working, preview your online store, add some products to your cart, and proceed to checkout. You will notice that your corresponding payment method is hidden during checkout if your conditions are met. For example, if you’ve set up payment customisation to hide the ‘Cash on Delivery’ payment method when any product in the cart has the tag ‘board,’ it will look like this:
- When you proceed to checkout, you will see payment methods like this, where the ‘Cash on Delivery’ option is not available:
- Hide shipping method implementation in checkout page:Let’s dive into how you can implement Delivery Customisation for your store:
- Start by ensuring that our app is installed on your store. To verify, simply type “Checkoutstride” into your search bar, and you should find it listed there.
- After launching our app, you’ll be directed to the main dashboard. From here, locate the card button named ‘Hide shipping method,’ as highlighted below, and give it a click. This will take you to our Delivery Customisation screen.

- You’re now on the Delivery Customisation screen, and it should look something like this:

- At this point, you’ll see a blank form titled ‘Various Types and Shipping Methods to Add.’

- In the ‘Title’ field, enter a name that helps you identify this customisation easily.
- Now, select the type of validation you want to use. We offer multiple validation types to suit your needs:
- Product cart based validation:
This method hides specific shipping methods based on tags associated with products in the customer’s cart. It meticulously checks each product’s tags and decides whether to display or conceal the shipping method. You’ll need to set conditions, like whether the tag must be present in all products or just one of them, and whether it must contain or not contain certain tags. This is shown in the highlighted image below. Don’t forget to enter the product tags you want to match in the ‘Tags’ field. Additionally, input the product tags you wish to match within the designated ‘Tags’ field.
- Cart attribute based validation:
This method hides certain shipping methods based on cart attributes present in the customer’s cart. It carefully assesses each cart attribute and determines whether to show or hide the shipping method. To set this up, provide the cart attribute key and specify the action type, such as “not set,” “not equal to,” “equal to,” “set but not equal to,” and so on. If you’re using conditions like “equal to” or “set and not equal to,” you must also enter the corresponding attribute value, as shown in the image below.

- Customer tag based:
This method hides specific shipping methods based on the customer’s tags, which are found in their details. It evaluates each of these tags and decides whether to display or hide the shipping method. To implement this, enter the corresponding tags and specify the desired action type, like “contains” or “does not contain,” as demonstrated in the image below. Also, make sure to write the corresponding tag you want to match.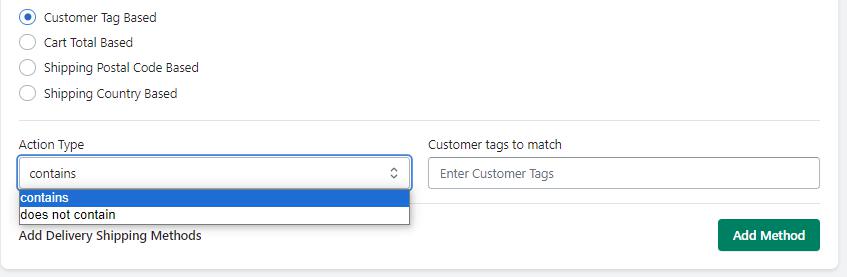
- Cart total based:
This method hides specific shipping methods based on the total value of the customer’s cart. It calculates the total and determines whether to show or hide the shipping method. You’ll need to provide the compared price and specify its condition type, such as “equal to,” “greater than” or “less than” the given price, as shown in the image below

- Shipping postal code based:
This method hides specific shipping methods based on the customer’s postal code, which is part of their shipping details. It evaluates these postal codes and decides whether to show or hide the shipping method. To set this up, provide the corresponding postal codes to match and specify the desired action type, such as “contains” or “does not contain,” as shown in the image below.

- Shipping Country Based:
This method hides specific shipping methods based on the customer’s country code, also present in their shipping details. It assesses these country codes and decides whether to show or hide the shipping method. To implement this, check the corresponding country codes you want to match in the checkbox list and specify the desired action type, such as “contains” or “does not contain,” as shown in the image below.

- Product cart based validation:
- Now, all you need to do is enter the names of the shipping methods you want to disable. Whether it’s third-party shipping providers or manual shipping methods, be accurate when entering the shipping method names, as they will be matched precisely. To avoid errors, refer to your Shopify admin -> Settings -> Shipping screen, as shown below. Copy the shipping method name from there and paste it into the ‘Add Method’ text field. Save to enable this shipping customisation. You can also check the status of your shipping customisation by clicking on the ‘Manage Shipping’ button in the ‘Hide Shipping Method’ card. It will look something like this:
 Here, you can view your newly created active shipping customisation. You have the flexibility to edit, delete, or deactivate it as per your requirements.
 - To confirm that your customisation is working as expected, preview your online store, add some products to your cart, and proceed to checkout. You’ll notice that the corresponding shipping method is hidden during checkout if your conditions are met. For instance, if you’ve configured shipping customisation to hide the ‘Express’ shipping method when the customer’s cart total is less than $500, it will look like this:
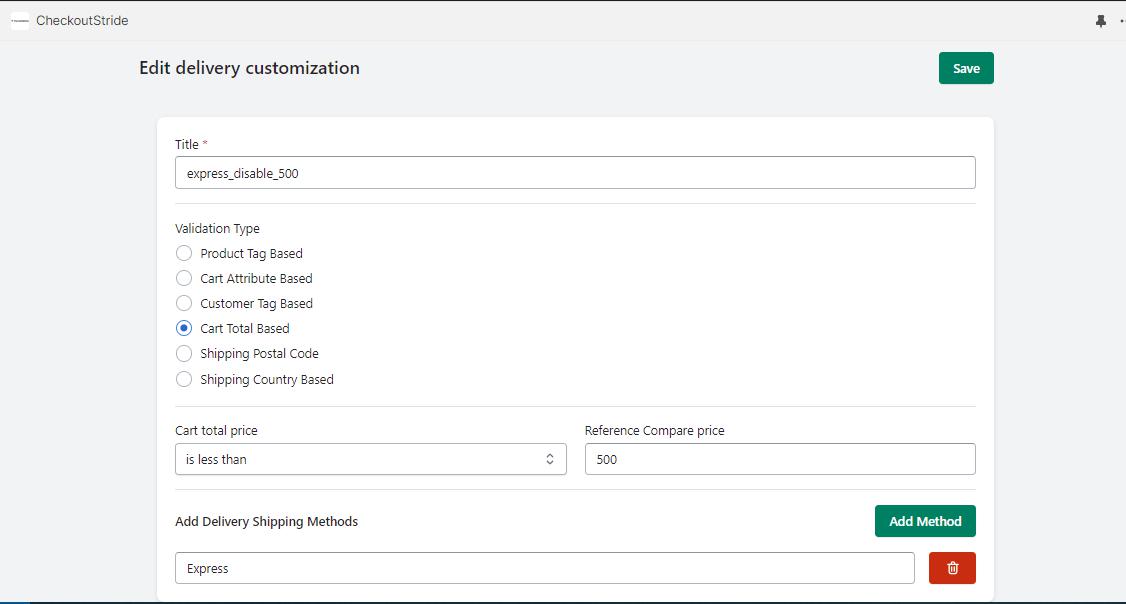
- As you proceed to checkout, you’ll see the shipping methods as follows, where the ‘Express’ delivery option is not available due to the cart total being less than $500:

- Implementation of Additional Information on the Checkout Page:
To implement the Additional Information functionality, please follow these steps:- Ensure that our app is installed on your store. To verify this, type “Checkoutstride” in your search bar; our app should appear in the results.
- Access your Shopify admin panel and navigate to ‘Settings’ > ‘Checkout’ > ‘Customize profile.’ Here, you can configure our checkout extension to enable Additional Information. It should resemble the following:

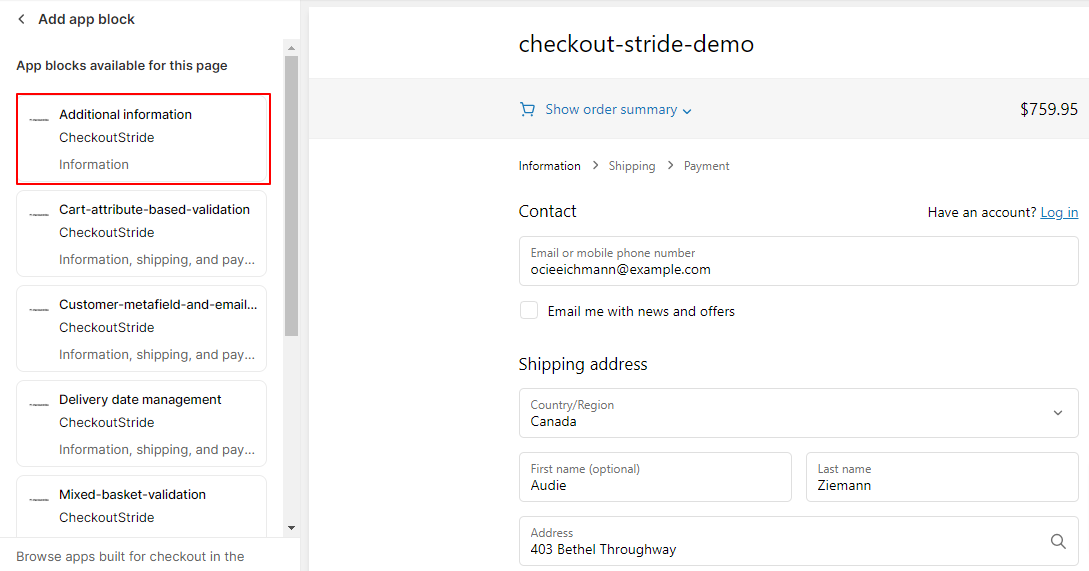
- Click on “Add app block.” This will display a list of extensions provided by our app, as shown in the image above.
- Select the extension named “Additional Information,” as highlighted in the image above. Since it’s dynamically rendered, you can place it anywhere within all three pages of the checkout process where it’s allowed. Simply drag and drop the extension block to your desired location and then click on the extension to open its settings, as shown below:

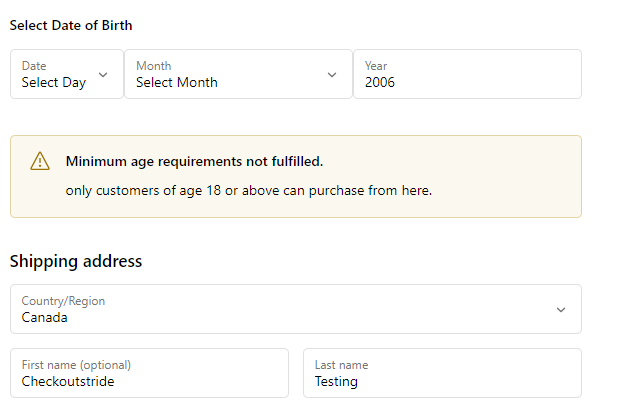
- First, enable the “Date of birth selection” radio button to activate our extension rendering. Next, you’ll find a field called “Age validation.”

- In the “Age validation” field, enter the minimum required age in years. For example, if you want to restrict checkout for customers under the age of 18, enter “18” in this field.

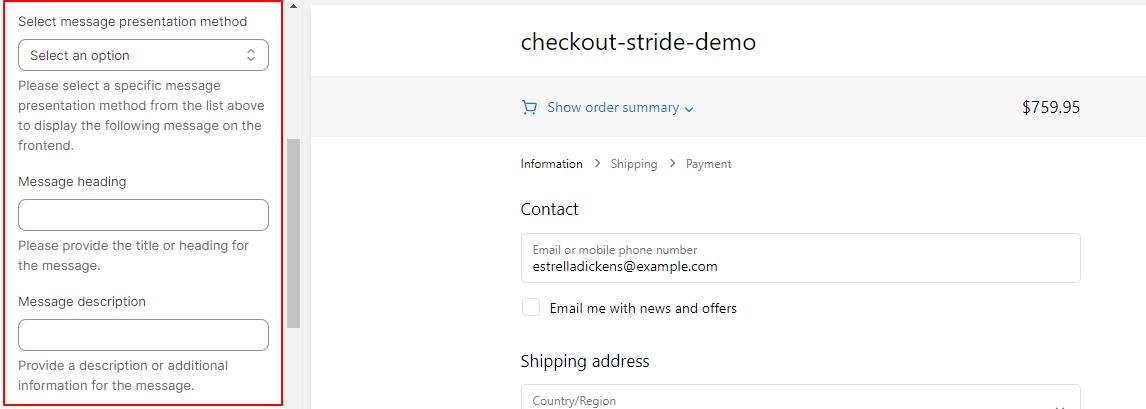
- To implement Additional Information, fill in the three highlighted fields shown above. These fields include a “presentation” method dropdown, where you can select the type of message to display, such as a banner or text block, with multiple options to choose from.
- After selecting the message type, provide a message header, which will serve as the title of your message. Then, enter a description for your message, which will be displayed below the title. If you prefer to display the header and description in a standard text format, you can do so here. However, for more creative message formatting, you can utilise a feature that allows you to add content in your preferred format and access it in the checkout block through a simple content ID. To use this feature, go to ‘App’ > ‘Checkoutstride Content’ as shown below:

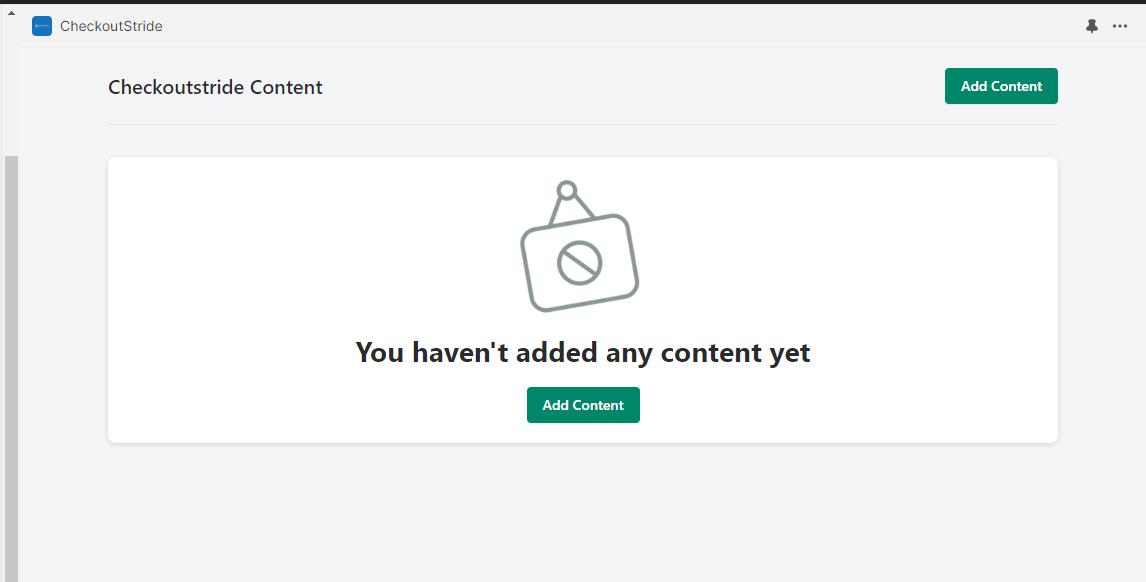
- It will resemble the following:

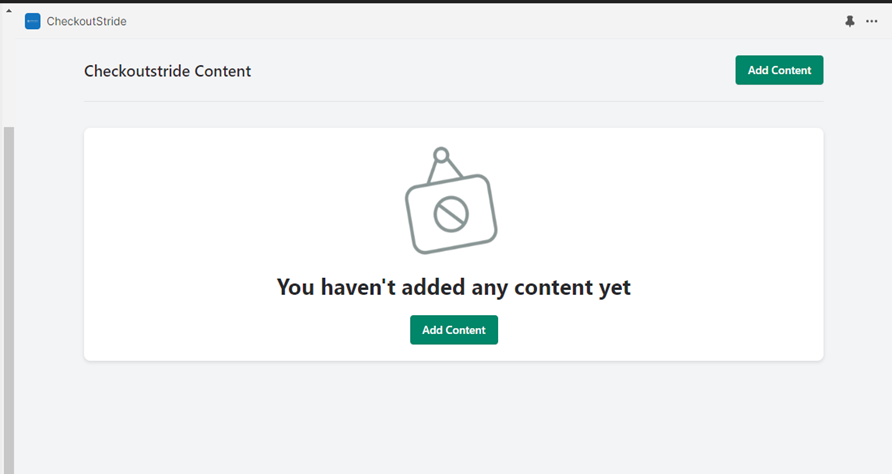
- Initially, you’ll see a banner indicating that no content has been added. To add your corresponding content, click on any of the “Add Content” buttons as displayed in the image above.
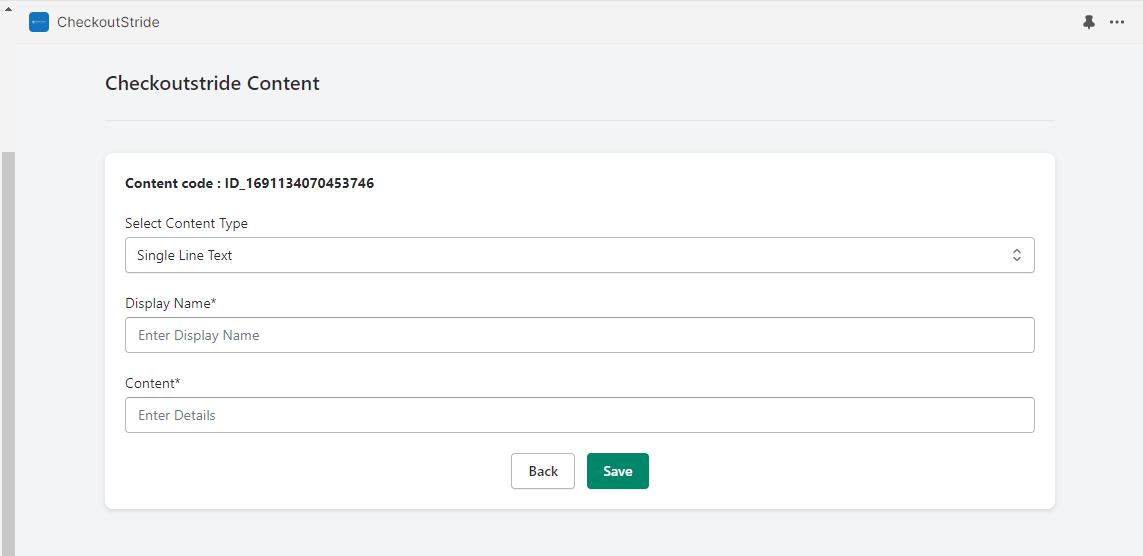
- After clicking “Add Content,” you’ll be directed to a screen where you can input your content, which will look like this:

- On this screen, you’ll first encounter a dropdown list offering various options to set your content type, such as Single-line, Multi-line, or Rich-text format.
- After selecting your desired content type, provide a display name for your content, which will be used for listing it. Then, input the content into the content box generated based on your selected option. Finally, click the save button.
- You will now be redirected to the Content Management Listing screen, where you can view your added content, as shown below:

- From here, simply copy the code for your listed content using the highlighted clipboard button. Once copied, navigate to your Shopify admin panel, specifically ‘Settings’ > ‘Checkout’ > ‘Customize profile,’ where you can access our extension block. Click on it and then paste the content code into the desired location, whether it’s in the heading or description. This functionality supports both fields, allowing you to Customize the content within your message block.

- After completing all the setup steps, save your changes and confirm that your module is operational. Preview your online store, add a product to your cart, and proceed to checkout. You should now see the Additional Information module in action, exactly where you placed it within your checkout app block.
- If a customer enters a date of birth indicating an age below the specified threshold (e.g., under 18 years old), our custom message block will be displayed, blocking their purchase journey. Therefore, customers with invalid ages cannot proceed with the checkout process.
- Implementing Order Information & Cross-Sell Products on the Checkout Page:
To implement the Order Information & Cross-Sell Products functionality, please follow these steps:- Ensure that our app is installed on your store. To verify this, simply type “Checkoutstride” into your search bar, and it should appear in the listings.
- Navigate to your Shopify admin panel and access ‘Settings -> Checkout -> Customize profile.’ Here, you can configure our checkout extension to enable additional information. It should resemble the following:
- Click on “Add app block.” This will display a list of extensions provided by our app, as shown here:

- From this list, click on the extension named “Order Information and Cross-Sell,” highlighted in the image above. Since it is dynamically rendered, you can place it anywhere within all three pages of the checkout where it is allowed. Simply drag and drop the extension block to your desired location, then click on the extension to access its settings, as shown in the image below:
- To enable order notes from customers, start by enabling the radio button labeled ‘Enable notes on order.’ This activates our extension and renders it as follows:

- In our checkout extension, it will appear as shown above when order notes are enabled.

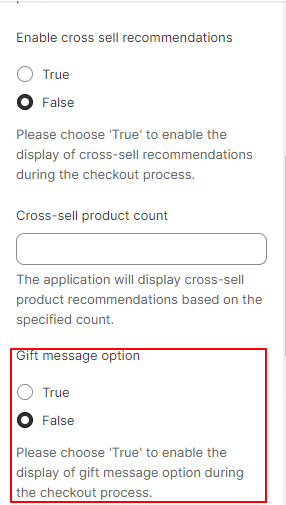
- Next, there are two other options to consider. The first is to enable cross-sell recommendations, which you should enable if you want to add a cross-sell product block during checkout.
- After enabling cross-sell recommendations, you need to specify the cross-sell product count limit. This limit defines how many additional products to show the customer during checkout. These products will be based on recommendations generated from the items already present in the cart.
- For example, if you enable cross-sell products and set the product limit to 3, the checkout will display something like this, based on the contents of the cart.

- Moving on, there is another field named ‘Gift message option,’ as shown below:
- You can enable this field if you wish to provide customers with the option to include a gift message. Enabling this feature will modify the checkout to include a gift message option, as shown below:

- To add an extra input field of your desired type, you need to select the field type in the provided settings, as illustrated below:

- You can choose from various field types. Once selected, you need to input the field label or question, as shown below:
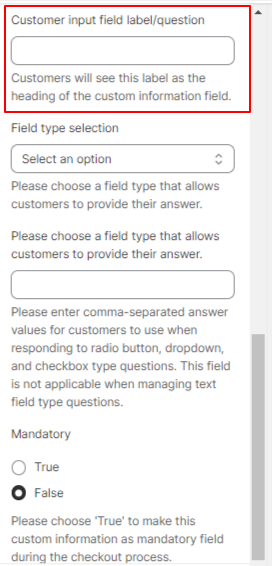
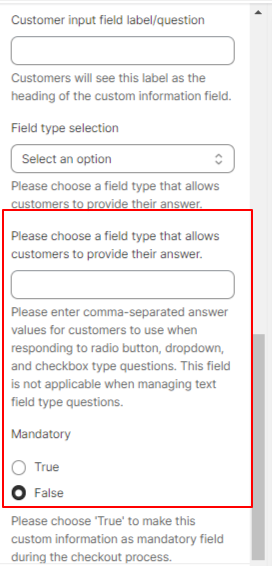
- After filling out this field, you need to enter the answer field, as displayed in the screenshot above. The answer should be provided based on the selected field type, as indicated in the answer field description.
- If you want this field to be mandatory, select ‘true’ to require customers to fill it out during checkout, as shown below:
- After completing all the setup, save it. To confirm that your module is functioning correctly, preview your online store, add some products to your cart, and proceed to checkout. You will then be able to see your module in action in the location where you placed it in your checkout app block, as described below:
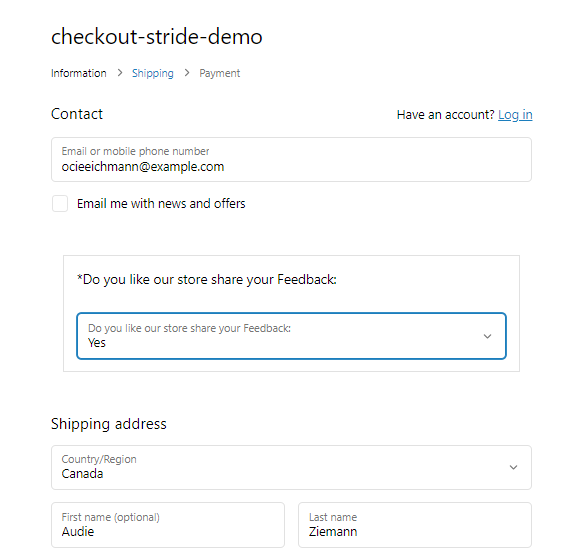
- As an example, we have set the label question to ‘Do you like our store? Share your feedback’ and the type to ‘dropdown.’ The answer field includes ‘Yes’ and ‘No,’ with the mandatory setting set to ‘true.’
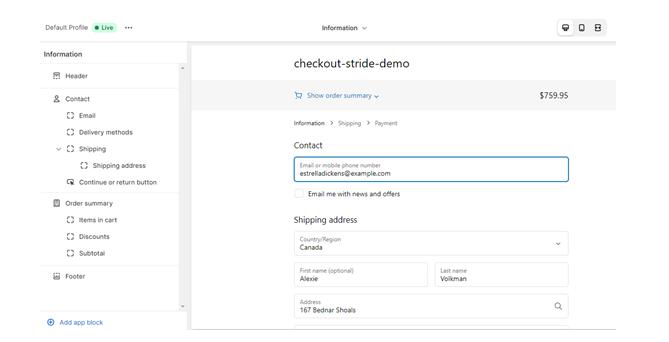
Delivery Date Management Implementation In Checkout Page: Enable Delivery Date functionality by following these steps:
- Ensure our app is installed on your store by searching for “Checkoutstride” in your search bar; it should appear in the results.

- Upon launching our app, you’ll be directed to the main dashboard. From there, simply click on the navigation link to access the Delivery Date Settings screen, as depicted in the image below.
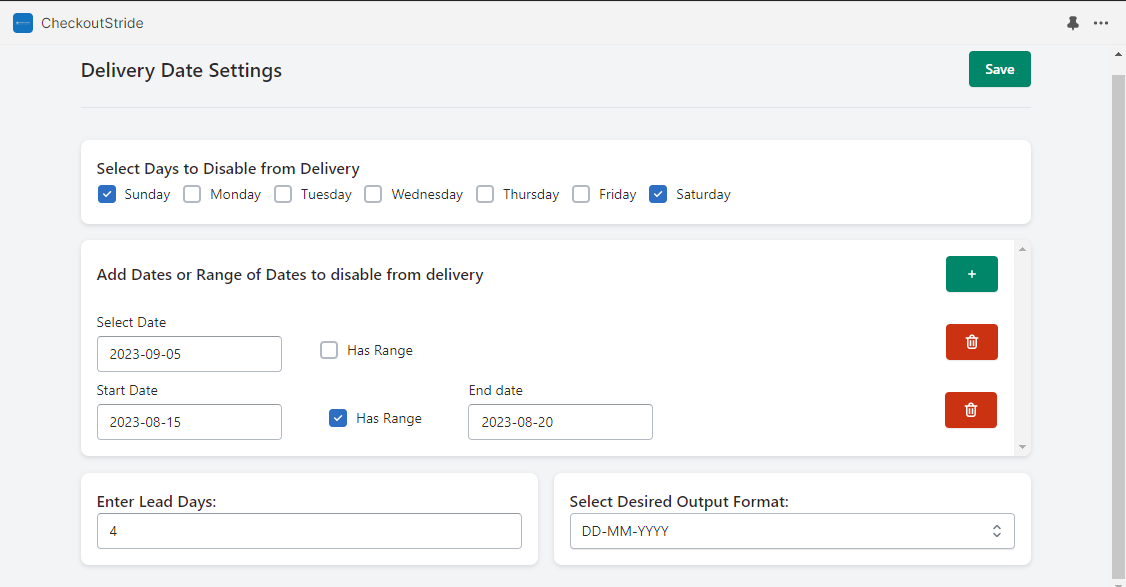
- You will be able to see the Delivery Date Setting screen below:

- Currently, all fields are empty for the first time. Please fill them according to your specific requirements.
- The initial card allows you to ‘Select days to disable from delivery,’ enabling you to specify particular days, such as weekends, for exclusion from the extension. This prevents customers from selecting those days.
- Another card is dedicated to ‘Add dates or a range of dates to disable from delivery.’ You can input specific dates for exclusion from the extension. Alternatively, you can disable a range of dates by checking the ‘Has range’ checkbox, which will prompt the display of two input date fields. You can create multiple combinations, making it efficient to disable ranges, especially during extended weekends, rather than entering individual dates one by one.

- Explore the ‘Lead Time’ card to specify the number of days your organization requires for preparation before delivery. The default setting is zero.
- Discover the ‘Output Format Selection’ card, allowing you to choose the preferred delivery date format for your order confirmation. Multiple options are available for your selection.

- For instance, once you’ve entered the necessary information, the display will appear as follows:
- Click the “Save” button to apply and save the changes.
- After saving, navigate to your Shopify admin, go to ‘Settings -> Checkout -> Customize profile.’ The interface will appear as follows:
- Clicking on “Add app block” from this point will display a list of extensions offered by our application, as depicted here:

- Click on the extension labeled “Delivery Date Management,” as shown in the image above. Since it appears on both the Shipping and Payments pages, you can position it anywhere within these checkout pages where Drag and Drop functionality is permitted. Move the extension block to your preferred location.
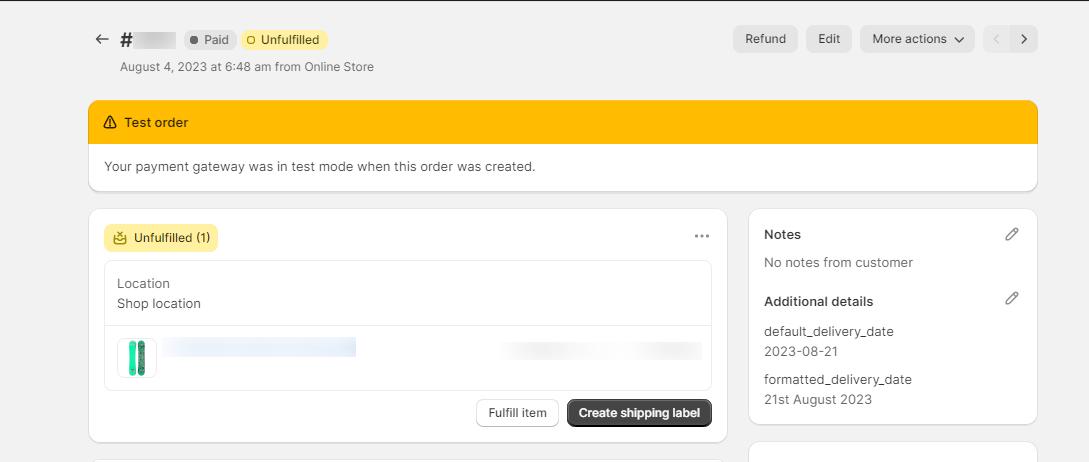
- To verify the functionality of your Delivery Date module in your online store, follow these steps: Add a product to your cart and proceed to checkout. You will then observe the Date Picker in action, located within the checkout app block as detailed below.

- You have the flexibility to add it in multiple locations. Additionally, you can easily edit or modify the settings through the provided screen. Any changes made will be reflected once you save them. Moreover, when placing an order, you will find the selected delivery date specified by the customer in two forms, as demonstrated below.
- Integration of trust badges on the checkout page
To integrate Trustbadge functionality, please follow these steps:
- Ensure that the checkoutstride app is installed on your store. To confirm, type “Checkoutstride” in your search bar, and it should appear in the results.
- Once the app is open, navigate to the main dashboard. Click on the specified navigation link to access the Trust-badge management screen, as illustrated in the image below:

- You are currently viewing the Trustbadge management screen. Please see below screenshot of how it looks:
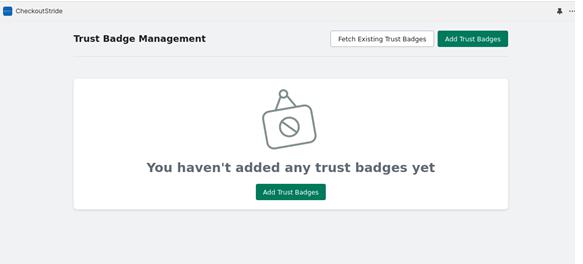
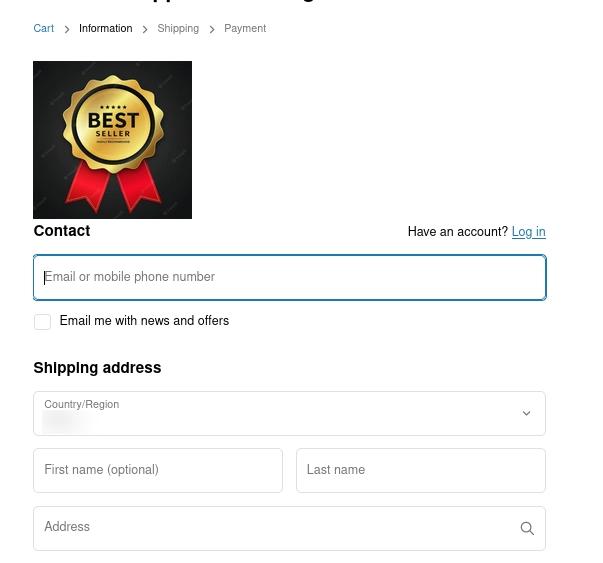
- Currently, you will see a banner indicating the absence of images. To include your relevant trust badges, simply click on any “Add Trustbadge” button, as illustrated in the above image.
- Upon clicking the “Add” button, a popup box will appear, allowing you to upload your local images, as demonstrated below:

- To add images, click on the “Add Images” text, which will open your native file dialog box. Locate your image and open it, or simply drag and drop your images directly onto the popup.
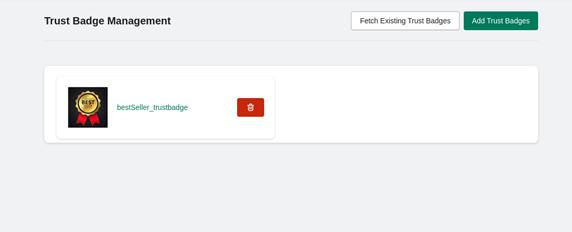
- Once the image is selected, the popup will automatically close, and the upload process will begin. If you don’t see any images, click on the secondary button labeled “Fetch Existing Trust Badges” to view a thumbnail of your image along with its uploading status.
- Once the image is successfully uploaded, it will appear as shown below:
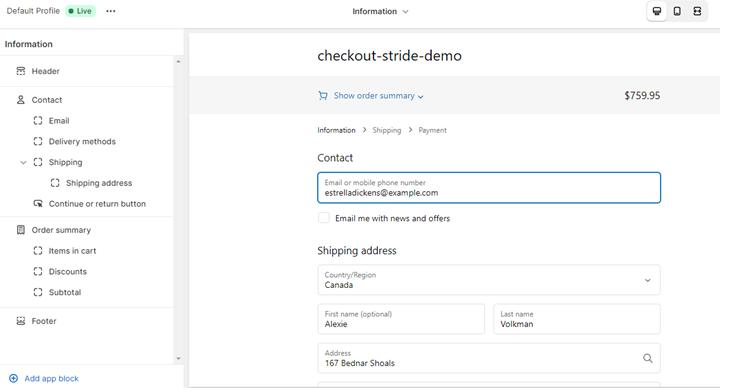
- To complete the remaining task, navigate to the ‘Settings’ in your Shopify admin, then select ‘Checkout’ and click on ‘Customize profile.’ On this screen, configure your checkout extension to enable trust badge images. The setup will resemble the following:

- Proceed by selecting “Add app block.” This action will display a list of extensions offered by Checkoutstride application, as depicted below:
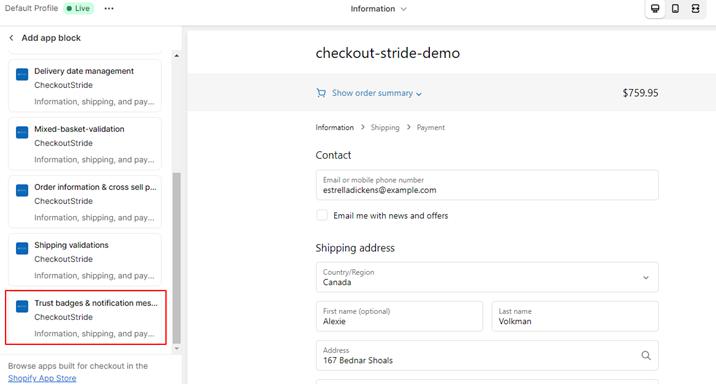
- To set up the Trustbadge & notification message extension, navigate to the designated section by clicking on the highlighted area in the above image. Since it is dynamically rendered, you have the flexibility to position it within all three checkout pages where permitted. Simply drag and drop the extension block to your preferred location, and then click on the extension to access its settings, as illustrated in the image below.

- Simply activate the ‘Activate trust badge’ radio button to enable your trust badges.
- To ensure that your trust badge is operational, preview your online store by adding products to your cart and proceeding to checkout. You will then observe your trust badges in action, positioned within your checkout app block as detailed below. Additionally, you have the option to enhance the display by adding more images to showcase multiple badges. Furthermore, the ability to remove existing trust badges is also available on the trust badge screen.
- Display of notification messages on the checkout page based on specified conditions.
To enable the Notification Message feature, please follow these steps:
- Ensure that Checkoutstride app is installed on your store. To confirm, type “Checkoutstride” in your search bar, and it should appear in the list.
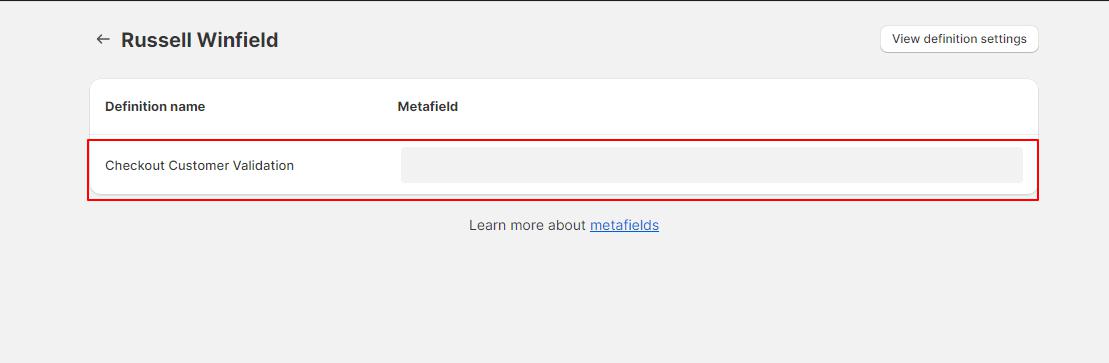
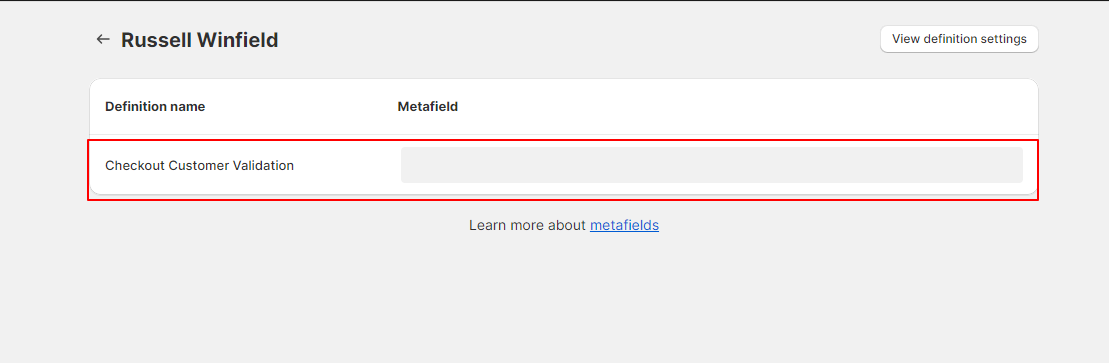
- The Notification Message functionality relies on customer metafields, which are automatically created during app installation. To verify, navigate to your customers screen, choose any customer, and click “Show Metafields” to reveal the metafield card. Look for our added metafield textbox named ‘Checkout Customer Validation,’ highlighted below:
- Fill in this field with your preferred parameter value and ensure to keep the value handy, as it will be necessary at the checkout block to compare and validate customers based on this information.
- After completing this step, navigate to the ‘Settings->Checkout->Customize profile’ screen in your Shopify admin. From there, configure your checkout extension to enable trust badge images. The setup will resemble the following example.
- The next step involves selecting “Add app block.” This action will display a list of extensions offered by Checkoutstride app, as illustrated below:

- Navigate to the “Trustbadge & Notification Message” extension by clicking on it as indicated in the image above. Since it is dynamically rendered, you can easily place it on any of the three checkout pages where drag-and-drop functionality is allowed. Move the extension block to your preferred location and then access its settings by clicking on the extension, as illustrated in the image below.
- Choose the desired ‘presentation’ method from the dropdown, which includes options like Banner or Textblock.
- Once the message type is selected, provide a title for the message in the message header. Following that, fill in the description of the message, which will be displayed beneath the title.
- If you prefer a standard text format for the heading and description, you can set it up at this point. However, for a more creative message block, there’s an exciting functionality available.
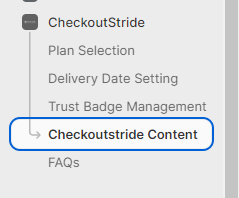
- To enhance your message block creatively, navigate to the App->Checkoutstride Content page. Here, you can add content in your preferred format and easily access it in the checkout block using a simple content_id.

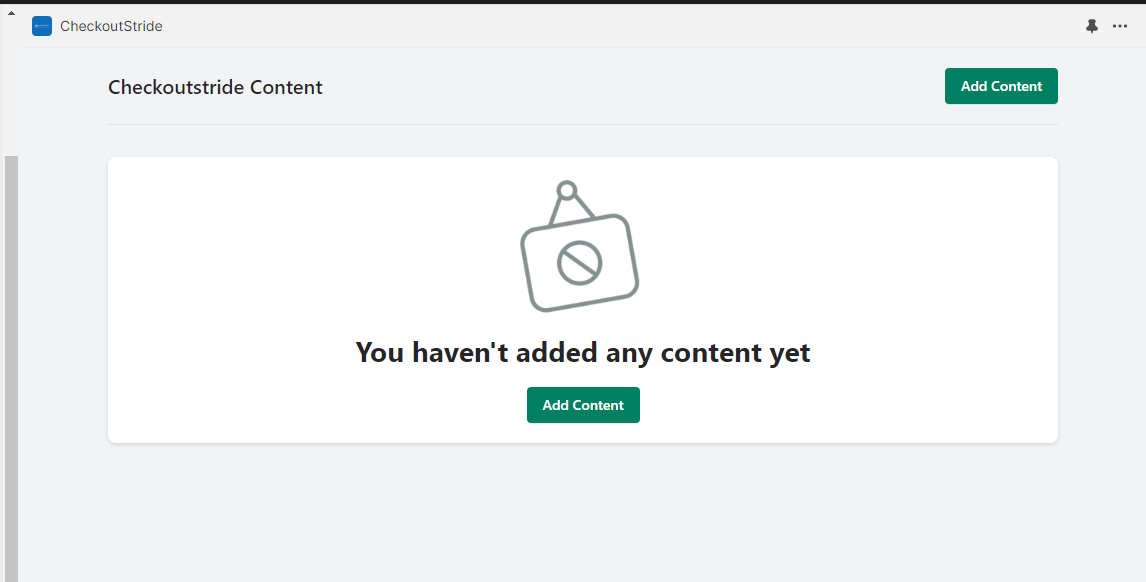
This will resemble something like below:
- At present, you’ll encounter a banner indicating that no content has been added. To include your relevant content, simply click on any of the “Add Content” buttons, as illustrated in the accompanying image.
- Upon clicking the “Add Content” button, a screen will appear, allowing you to input your content. The interface will resemble the example provided below:
- Begin by accessing the screen where you’ll find a dropdown list offering different options such as Single-line, Multi-line, or Rich-text format for configuring your content type.
- Once you’ve chosen your preferred content type, provide a display name for your content, which will be visible on Checkoutstride listing screen. After entering the display name, proceed to the content box generated based on your selection. Populate the content in the box and click the save button.
- You will then be directed to the Content Management Listing screen, where you can view the content you added in the listing, as illustrated below:

- Copy the content code from the highlighted clipboard button. Navigate to your Shopify admin page, specifically under ‘Settings->Checkout->Customize profile.’ Locate our extension block and paste the content code into your preferred section, whether it’s the heading or description – both are supported. Your message block is now customized. Scroll down to find other highlighted settings below.

- In this section, there are two fields:
- Including field values
- Excluding field
Insert the previous value stored in the customer metafield here. Depending on your conditions, it will either display or hide the provided message block. For instance, if we place the field “PRIME” in the including box, whenever a customer with this metafield and value completes a checkout, a custom message block will be shown.
- Additionally, within the extension app block, there is another setting that displays a custom message block to customers with email addresses containing the specified domain, which you can enter in the provided field.
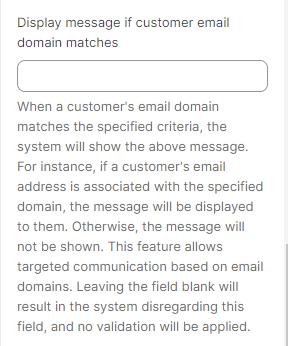
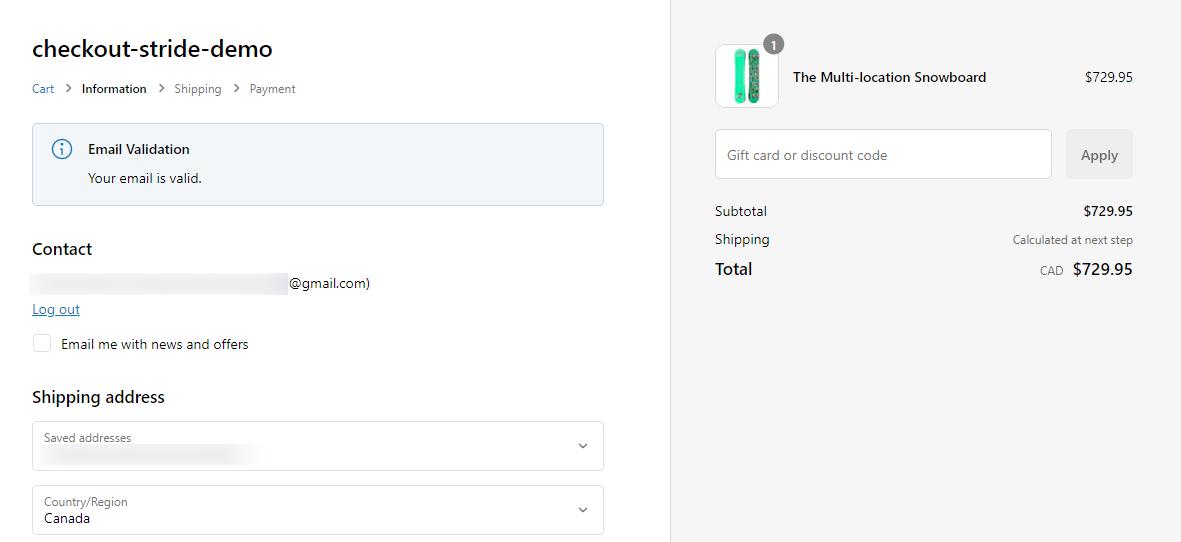
Consider the scenario where you aim to showcase a message block depending on the email address. If you wish to present a message specifically to users with email addresses from a certain domain, such as ‘gmail.com,’ you can input ‘gmail.com’ into the designated domain field. The extension will then verify the incoming email and determine whether to display or hide the message accordingly.
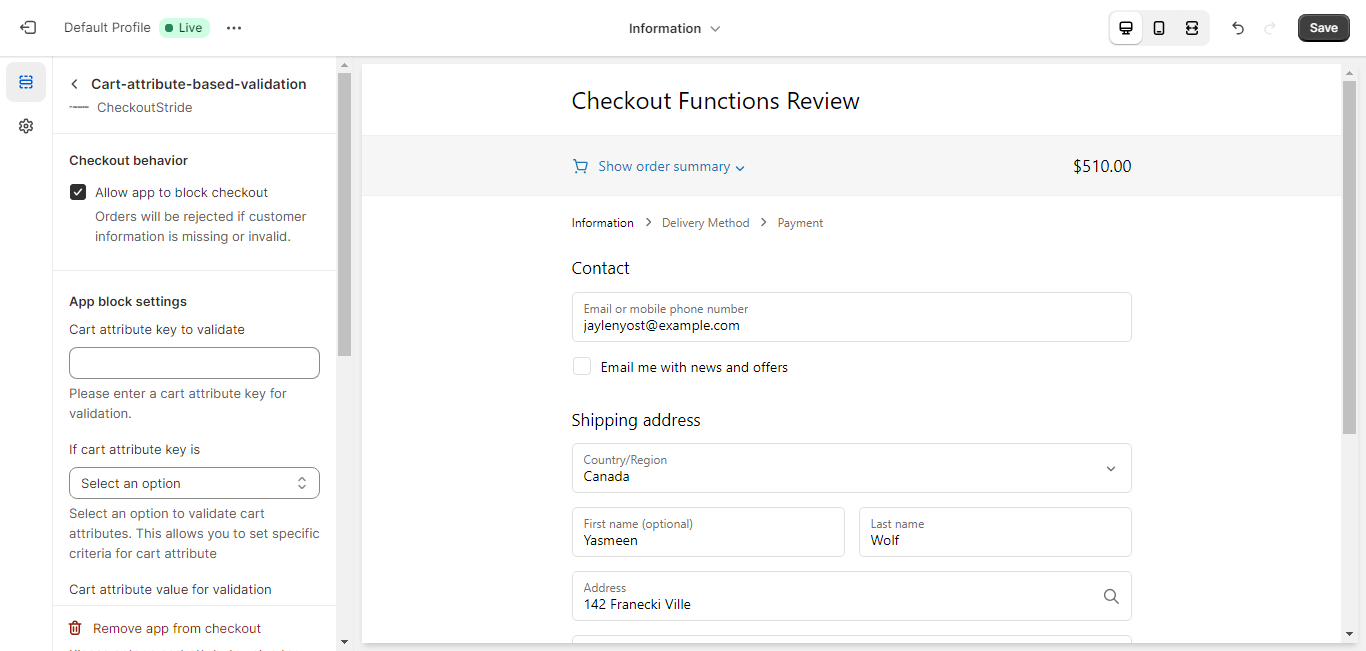
- Cart Attribute-Based Validation on the Checkout Page:
To implement Cart Attribute-Based Validation, follow these steps:- First, ensure that our app is installed on your store. To verify this, type “Checkoutstride” in your search bar, and it will appear in the search results.
-
Now, go to your Shopify admin, navigate to ‘Settings’ -> ‘Checkout’ -> ‘Customize Profile’ screen, and from there, set up your checkout extension to enable Trust Badge images. It will appear as follows: Navigate to your Shopify admin panel and go to ‘Settings -> Checkout -> Customize profile.’ Here, you can set up your checkout extension to enable Additional Information. It should resemble this:
-
Click on “Add App Block.” A list of extensions provided by our app will be displayed, as shown below:

-
From this list, click on the extension named “Cart Attribute-Based Validation,” as highlighted in the image above. Since it is dynamically rendered, you can place it anywhere within the three pages of checkout where it is allowed. Drag and drop the extension block to your desired location and then click on the extension to open its settings, as shown in the image below:
-
You need to provide the following information:
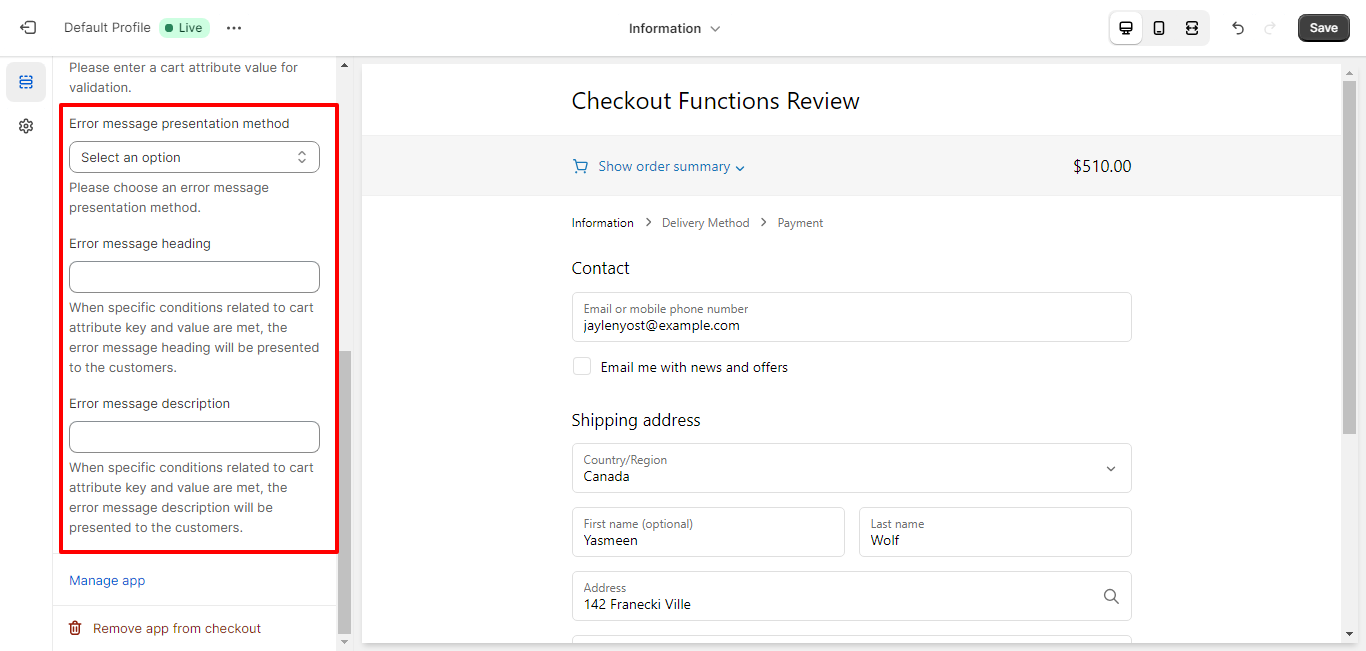
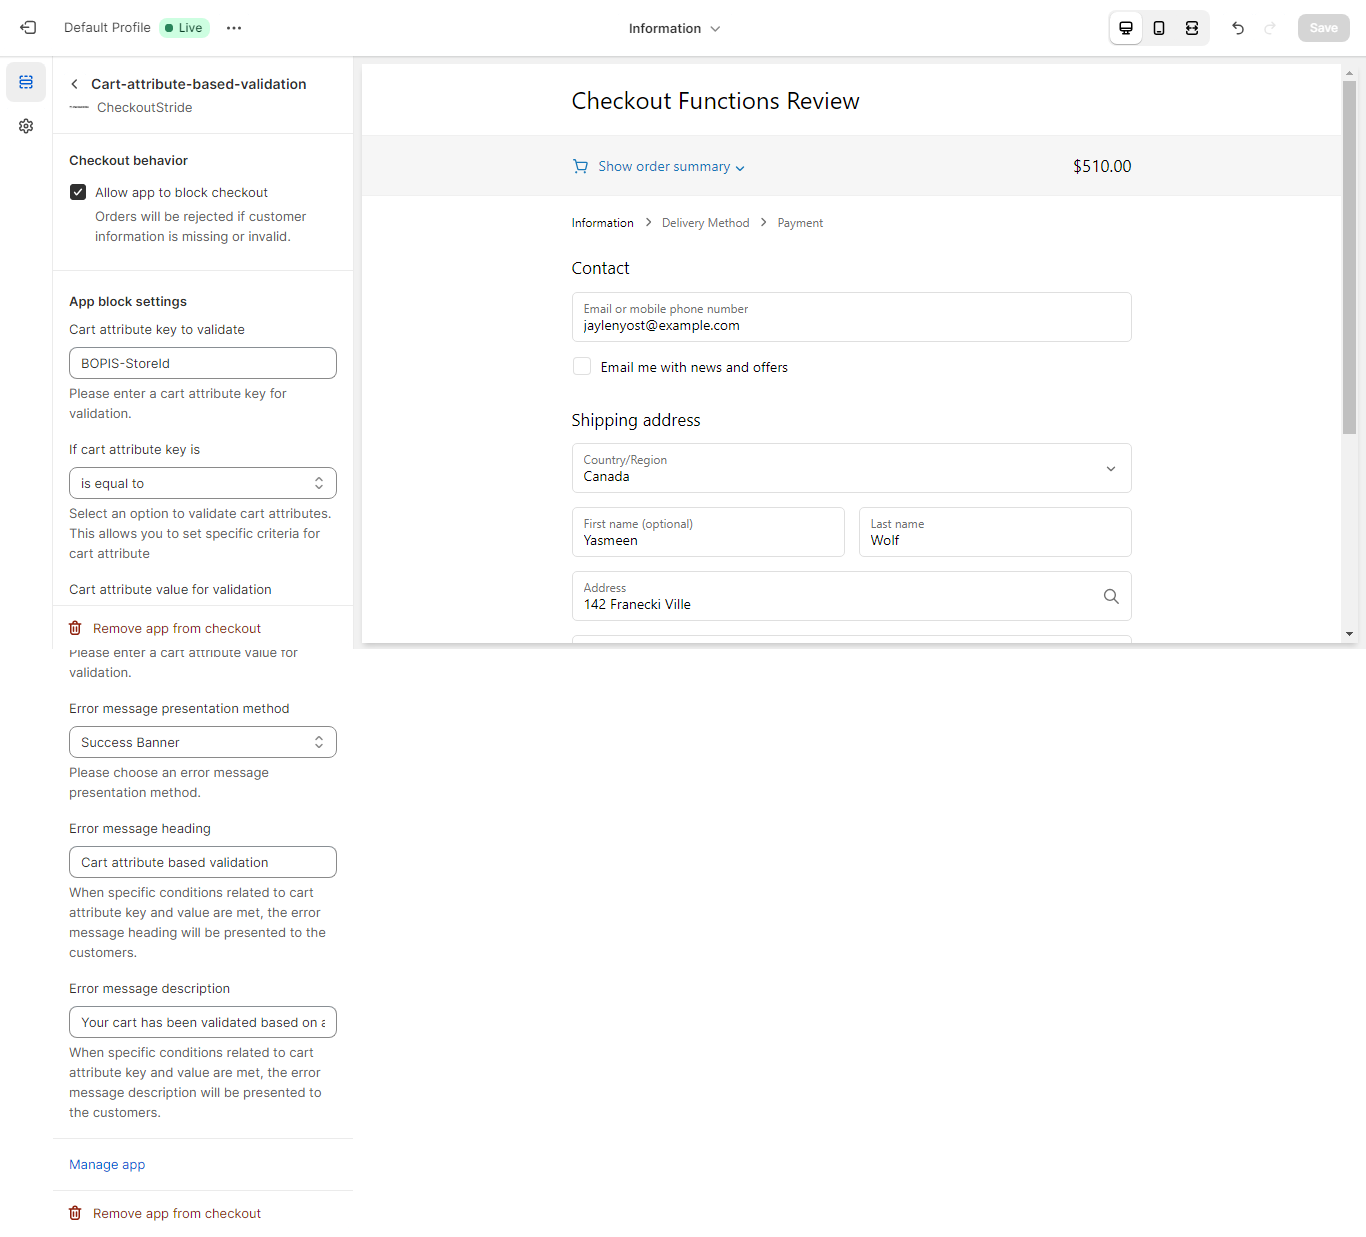
- “Cart Attribute Key to Validate”
- Select an option from “If Cart Attribute Key Is”
- “Cart Attribute Value for Validation”
- Select Banner Type
- Enter Message Heading and/or Banner Description to enable the extension.
-
As an example, let’s use “BOPIS-StoreId” as the attribute key and “1” as the value. Fill in these details and choose the appropriate option from the dropdown menu, as shown in the image below:

-
To implement the notification message, select and fill in the three fields highlighted above, which include a “presentation” method dropdown where you can choose the type of message you want to display, such as a banner or text block:
-
After selecting the message type, provide a message header as the title of your message. You can also fill in the description of your message, which will appear below the title. If you wish to format your message creatively, you have the option to add content in your preferred format. You can then access it in the checkout block through a simple content ID. To use this functionality, go to ‘App’ -> ‘Checkoutstride Content’ page, as shown below:

-
It will appear as follows:

- Currently, you will see a banner indicating that no content has been added. To add your corresponding content, click on any of the “Add Content” buttons, as shown in the image above.
-
After clicking “Add Content,” you will be directed to a screen where you can add your content. It will look something like this:

- On this screen, you will find a dropdown list with various options to set your content type, such as Single-line, Multi-line, or Rich-text format.
- After selecting your desired content type, provide a display name for your content, which will be shown in our listing screen. Add the content in the content box, which will be generated based on your selected option. Fill in the content and then click thesave button.
-
You will be redirected to the Content Management Listing screen. Here, you can see your added content in the listing, as shown below. Simply copy your listed content code from the highlighted clipboard button.

Now, return to your Shopify admin, navigate to ‘Settings’ -> ‘Checkout’ -> ‘Customize Profile’ page, where you will find our extension block. Click on it and paste the content code in the desired location, whether it’s in the heading or description. It supports both fields, allowing you to Customize the content in your message block.
- As an example, if we have the key “BOPIS-StoreId” and the value “1” in the attribute, fill in the details and select the appropriate option from the dropdown, following the steps mentioned above for the notification message. The final filled-up settings will resemble the image below:
-
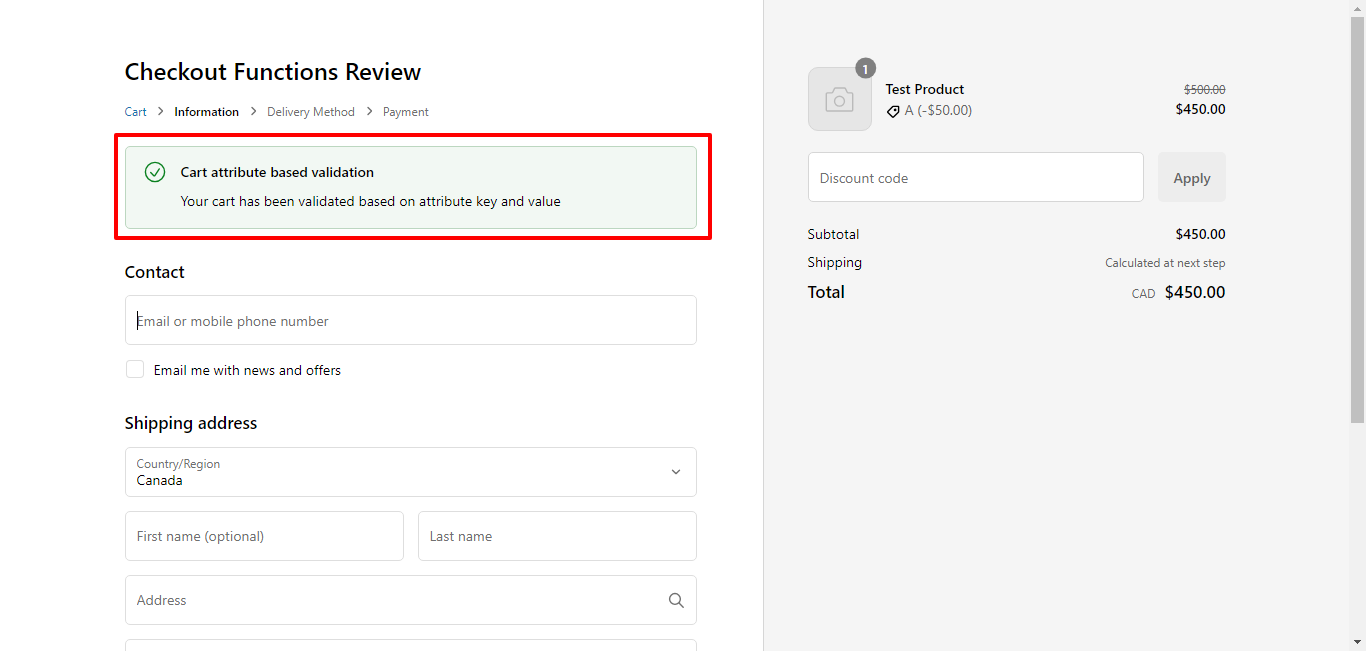
If the key “BOPIS-StoreId” and the value “1” are present in the attribute, and the selected option is “is equal to,” a notification message will be displayed on the checkout page, as shown below:
- If the key “BOPIS-StoreId” and the value “1” are present in the attribute, and the selected option is “is not equal to,” no notification message will be displayed on the checkout page.
- If the key “BOPIS-StoreId” and the value “1” are present in the attribute, and the selected option is “is not set,” it will only check for the key’s presence. If the key is not present in the attribute, a notification message will be displayed, but if the key is present, there will be no banner in the checkout page.
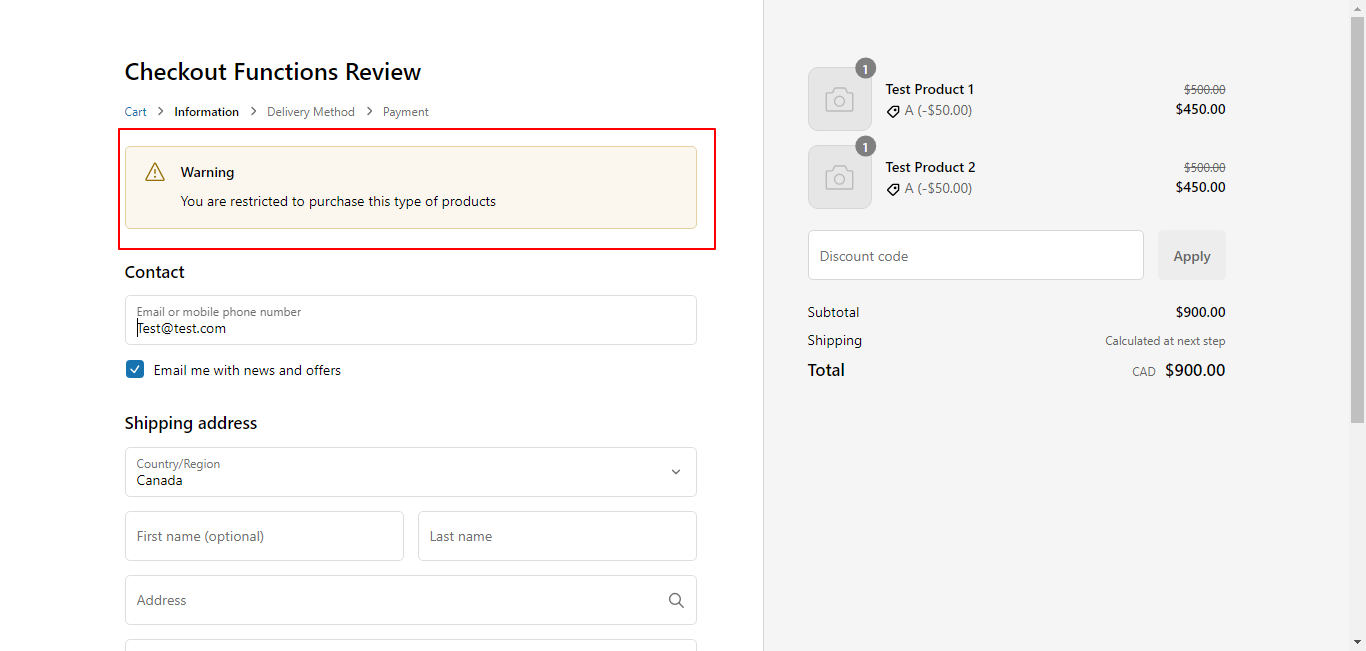
Consequently, the user’s checkout process will be blocked. The second aspect relates to the country code, where only customers from specified countries can make purchases from our store. Any users from countries not on the list will encounter a message block and will be unable to proceed with checkout.
- Implementing Shipping Validation on the Checkout Page:
To implement the Shipping Validation functionality, please follow these steps:- Ensure that our app is installed on your store. To verify this, type “Checkoutstride” into your search bar, and it should appear in the listings.
-
Navigate to your Shopify admin panel and go to ‘Settings -> Checkout -> Customize profile.’ Here, you can set up your checkout extension to enable Additional Information. It should resemble this:
-
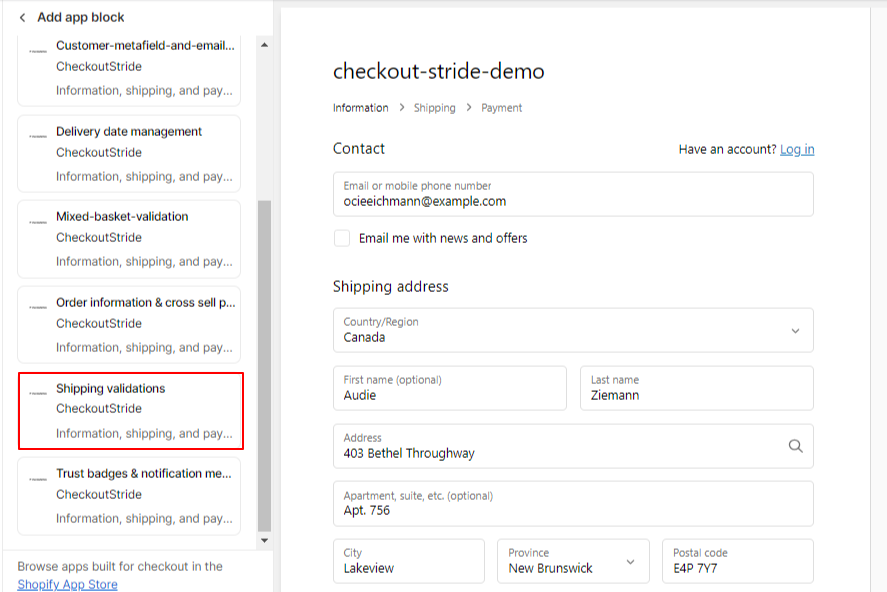
Click on “Add app block.” A list of extensions provided by our app will be displayed, as shown below:
-
Select the extension named “Shipping Validation,” highlighted in the image above. Since it is rendered on both the Shipping and Payments pages, you can place it anywhere within these two pages of the checkout where it is permitted. Simply drag and drop the extension block to your desired location. After that, click on the extension block to access its settings, which will look like this:

-
First, enable the “Enable PO box validation” radio button to activate our validation extension. Next, fill in other fields such as message type, message heading, and message description to create our message block, as shown below:

- To implement P.O. Box validation, select and fill in the three fields highlighted above. These fields include a ‘presentation’ method dropdown where you can choose the type of message you want to display, such as a Banner or Text block, among other options.
-
After selecting the message type, provide a message heading (the title of your message) and the message description (which appears below the title). If you wish to format the message block creatively, you can use our functionality to add content in your preferred format. Access this functionality by going to ‘App -> Checkoutstride Content page,’ as shown below:

-
The Content Management page will appear as follows:

- Currently, you will see a banner indicating that no content has been added. To add content, click on any of the “Add Content” buttons, as shown in the image above.
-
After clicking “Add content,” you will be taken to a screen where you can add your content, as shown below:

- On this screen, you will find a dropdown list with various options for setting your content type, such as Single-line, Multi-line, or Rich-text format.
- After selecting your desired content type, provide a display name for your content, which will be visible in our listing screen. Once filled, add content in the content box, generated based on your selected option. Fill in the content and click the save button.
-
You will be redirected to the Content Management Listing screen, where you can now see your added content, as shown below:

-
From here, simply copy the code for your listed content using the highlighted clipboard button. Once copied, go to your Shopify admin ‘Settings -> Checkout -> Customize profile’ page, where you will see our extension block. Click it and paste the content code in the desired location, whether it’s in the heading or description. This works for both fields, allowing you to Customize the content in your message block for P.O. Box validation.

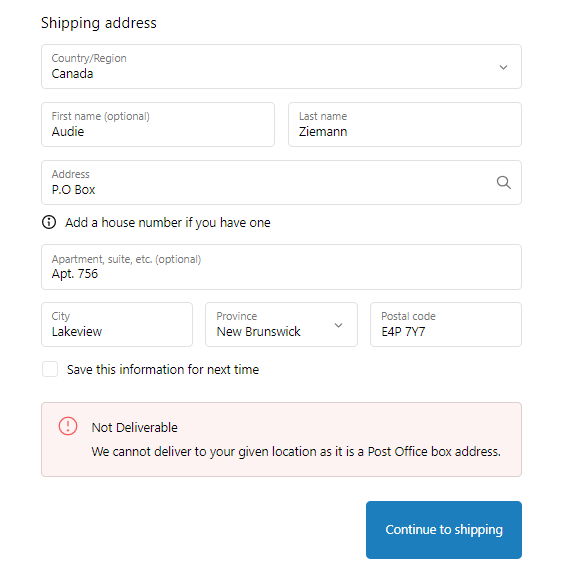
- For example, we have set P.O. Box validation to true, selected the presentation method as “Error Banner,” set the heading as “Not Deliverable,” and the description as “We cannot deliver to your given location as it is a Post Office box address,” as shown below:
-
During customer checkout, it will appear like this when a customer enters a P.O. box address in the shipping address:
-
Now, for country code validation, begin by selecting the ‘Country validation method’ dropdown, which offers options such as:
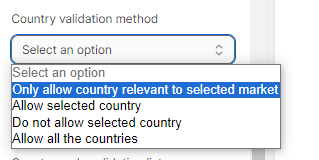
- The first option retrieves the selected market countries of the current store and validates based on that. The other option allows only the provided list of countries in the country list field. Another option is to disallow the provided list of countries in the country list from checkout, and the last option is to enable checkout for all countries.
- Next, provide the list of countries to allow or disallow based on your selected option. In the case of allowing all countries, it will not consider the list in the first option.
- List the country codes in lowercase, separated by commas, for example, “us, gb, in,” etc.
-
Additionally, provide information for the remaining three fields as highlighted:

- To implement Country validation, follow the same steps as for P.O. Box validation. Select and fill in the three fields highlighted above, including the ‘presentation’ method dropdown for choosing the type of message (e.g., Banner or Text block).
-
After selecting the message type, provide a message heading (the title of your message) and the message description (which appears below the title). If you wish to format the message block creatively, you can use our functionality to add content in your preferred format. Access this functionality by going to ‘App -> Checkoutstride Content page.’
-
The Content Management page will appear as follows:
- Currently, you will see a banner indicating that no content has been added. To add content, click on any of the “Add Content” buttons, as shown in the image above:
-
After clicking “Add content,” you will be taken to a screen where you can add your content, as shown below:

- On this screen, you will find a dropdown list with various options for setting your content type, such as Single-line, Multi-line, or Rich-text format
- After selecting your desired content type, provide a display name for your content, which will be visible in our listing screen. Once filled, add content in the content box, generated based on your selected option. Fill in the content and click the save button.
-
You will be redirected to the Content Management Listing screen, where you can now see your added content, as shown below:

- From here, simply copy the code for your listed content using the highlighted clipboard button. Once copied, go to your Shopify admin ‘Settings -> Checkout -> Customize profile’ page, where you will see our extension block. Click it and paste the content code in the desired location, whether it’s in the heading or description. This works for both fields, allowing you to Customize the content in your message block for Country Validation.
-
For example, we have set Country validation to not allow the selected countries, with the list ‘in, ca,’ and set the message type to warning. Corresponding message blocks are configured. During checkout, if a customer enters a shipping address of “CA,” it will appear like this and will not allow the user to proceed. If the user enters an address from another country, it will be disabled and checkout will not be allowed.

If the product tag in the cart does not match the entered tag, no further checks are performed. However, if the product tag matches, it verifies the customer’s metafield value. If the value matches the one entered, and the customer’s email domain matches the specified value, no notification message is displayed, and the checkout process continues. But if the product tag matches, and either the metafield value or the email domain does not match, a notification message is displayed, and the buyer’s journey is halted.
- Implementing Validation in the Checkout Page:
To implement Validation Based on Customer Metafield and Email Domain, follow these steps:- Ensure that our app is installed on your store. To confirm, type “Checkoutstride” in your search bar; it should appear in the results.
-
Access your Shopify admin and navigate to ‘Settings -> Checkout -> Customize profile.’ Here, set up the checkout extension to enable Validation Based on Customer Metafield and Email Domain. The interface will resemble this:
-
Click on “Add app block” to view the list of extensions provided by our app, as shown here:

-
Select the extension named “Validation Based on Customer Metafield and Email Domain” as highlighted in the image above. Since it’s dynamically rendered, you can place it anywhere on all three checkout pages where it’s allowed. Drag and drop the extension block to your preferred location, and then click on the extension to configure its settings, as depicted below:
-
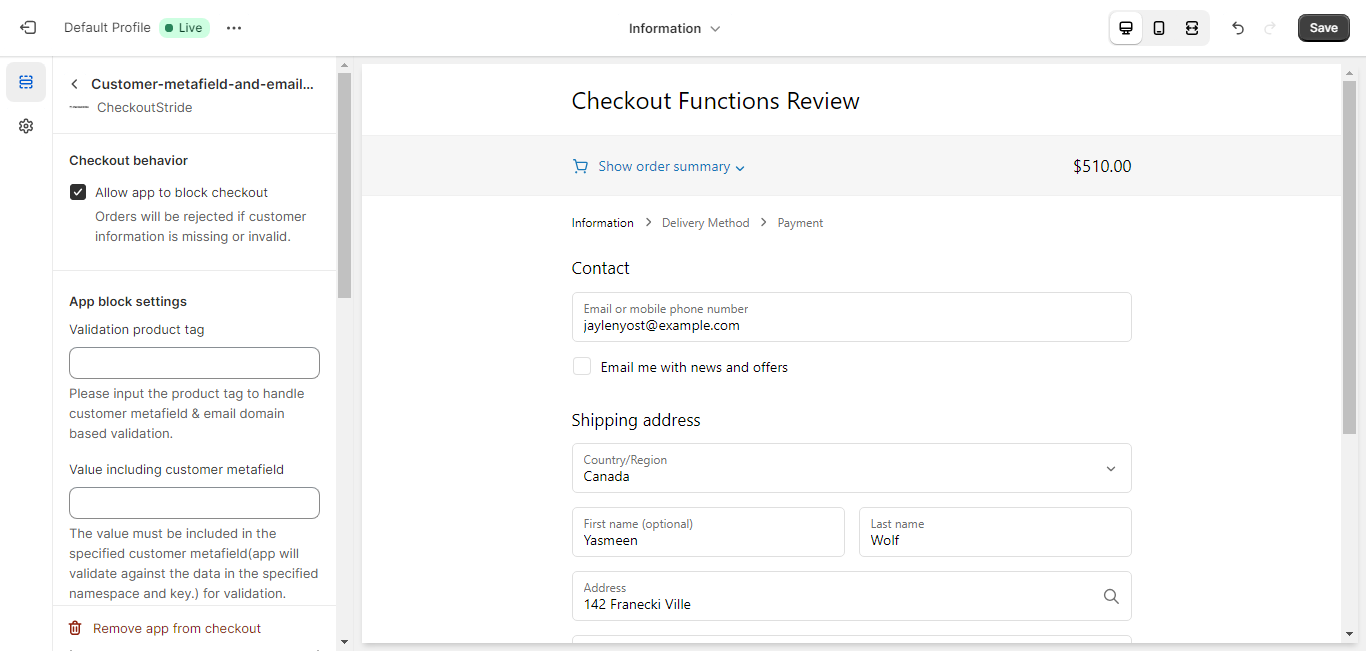
You need to enter the “Validation product tag,” and if you want to validate the “customer metafield,” provide the value. Also, fill in the “Customer email domain for validation.” You must select the “Error message presentation method” and specify a “Message heading” and/or “Message description” to enable the extension

- To set up the notification message, you should select and complete these three fields highlighted above, which include a “presentation” method dropdown for choosing the message type, such as Banner or Textblock. Various options are available.
-
After selecting the message type, enter the message header (title) and the message description (content). If you wish to format the message creatively, we provide a feature where you can add content in your desired format and then access it in the checkout block using a simple content ID. To use this feature, navigate to ‘App -> Checkoutstride Content’ as shown here:

-
The Content page will appear like this:

- Initially, it may show that no content has been added. To add your content, click on any “Add Content” button, as shown in the image above.
-
After clicking “Add Content,” you’ll be taken to a screen where you can input your content. It will resemble this:

- On this screen, you’ll first encounter a dropdown list offering various content types like Single-line, Multi-line, or Rich-text formats.
- After selecting your preferred content type, provide a display name for your content, which will appear in our listing screen. Once filled, add the content in the content box, which is generated based on your selected option. Fill in the content and click the save button.
-
You’ll then be directed to the Content Management Listing screen, where you can see the content you’ve added, as shown below:

From this point, simply copy the content code from the highlighted clipboard button. After copying, return to your Shopify admin ‘Settings -> Checkout -> Customize profile’ page. Locate our extension block, click it, and then paste the content code in the desired location, whether it’s the heading or description; it supports both fields, allowing you to Customize the content in your message block. -
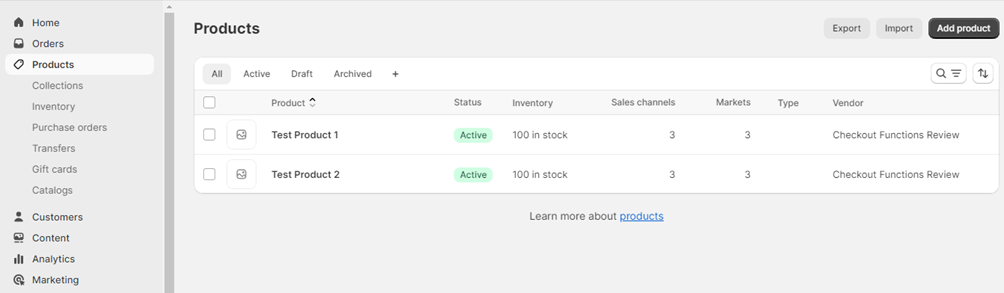
Now, you need to add or check product tags. To do this, navigate to the Admin panel -> Products, as displayed in the image below:
-
Clicking on “Products” will display a screen like the one below:

-
By selecting any product from the list, you’ll access the product detail page, as shown here:

- In the “Tags” section, you’ll find the “sport” tag that is already added. If you wish to add another tag, simply enter it in the “Tags” input box and click “Add tag.”
- Now, you can add or verify customer metafield values.
-
Our Validation Based on Customer Metafield and Email Domain functionality relies on customer metafields, which are created by default during app installation. To confirm this, access your customers’ screen, select any customer, and click “Show metafields” to reveal the metafield card, which includes our added metafield textbox named ‘Checkout Customer Validation,’ as highlighted below:
-
The last aspect to consider is the email domain validation. This means that the email domain entered during the shipping address stage of checkout is compared with the email domain entered in our app. If they match, no action is taken. However, if there is a mismatch, a notification message is displayed, and the checkout process is halted.
- Let’s delve into how this works. If the product tag entered in the “Validation product tag” does not match any of the product tags in the cart, then no further processing will occur. Additionally, no notification message will be displayed on the checkout page. However, in the case of a tag match, when you enter a value in “Value including customer metafield” and/or “Value excluding customer metafield,” the system will check for customer metafields.
- In the scenario where “Value including customer metafield” is used, if the entered tag matches the value in the customer’s metafield, no action will be taken. However, in the event of a mismatch, a notification message will be displayed, and the checkout process will come to a halt.
- Conversely, when working with “Value excluding customer metafield,” the process operates in the opposite manner.
-
To validate the customer’s email domain, the system checks it against the domain the customer entered when providing their shipping address. If there is a mismatch with our specified “Customer email domain for validation,” a notification message will be displayed, and the buyer’s journey will be interrupted.
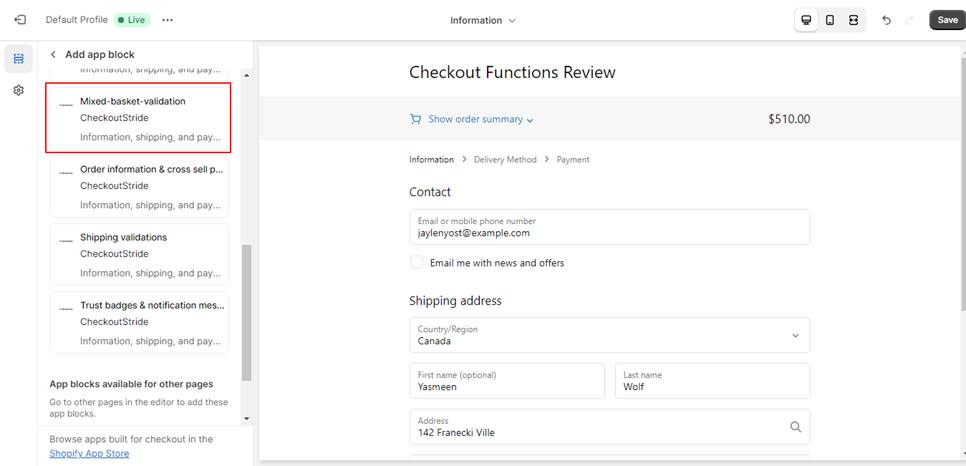
- Mixed-basket-validation in checkout page:
We can implement the Mixed-basket-validation feature by following these step-by-step instructions:- Firstly, it’s essential to confirm that our app is installed on your store. To verify this, perform a quick search for “Checkoutstride” in your store’s search bar, and it should be listed among the results.
- Now, proceed to your Shopify admin and navigate to the ‘Settings’ menu. Click on ‘Checkout,’ and then select ‘Customize profile.’ From this point, we will configure our checkout extension to enable the Mixed-basket-validation feature. This setup will look something like this:

- Within the Customize profile screen, you’ll find an option to “Add app block.” Clicking this option will present you with a list of extensions provided by our app, as demonstrated here:
-
Among the list of extensions, locate and click on the one named “Mixed-basket-validation,” as highlighted in the image above. Since it’s dynamically rendered, you have the flexibility to place it anywhere within all three pages of the checkout where it is allowed. Simply use drag-and-drop functionality to position the extension block in your preferred location, and then click on the extension to access its settings, as shown below:
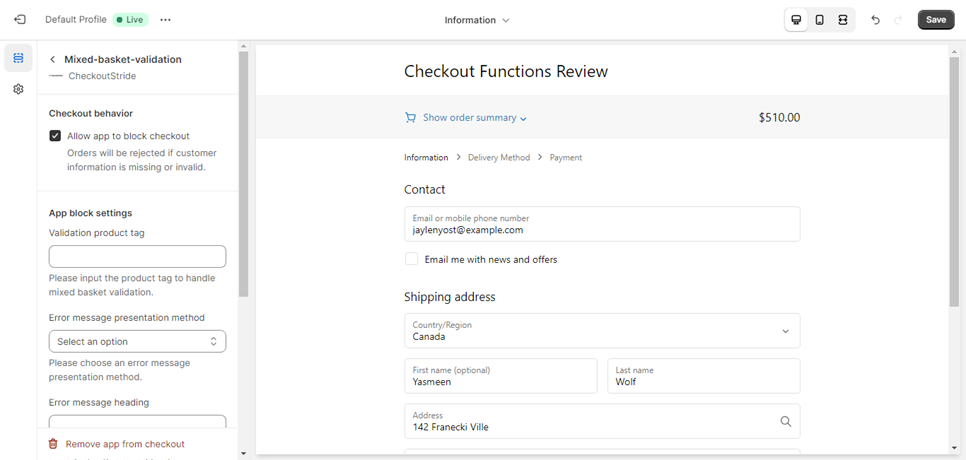
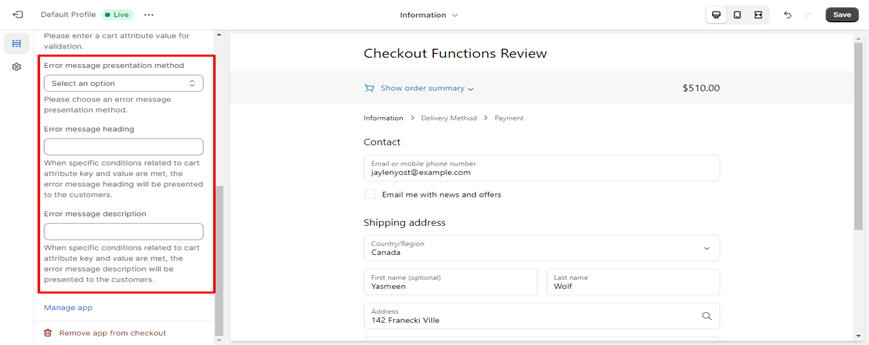
- In the extension settings, you’ll need to fill in the “Validation product tag.” Additionally, select the “Error message presentation method” and enter the “Message heading” and/or “Message description” to enable the extension.
-
As an example, let’s say we want to check for a tag named “Sport.” In this case, enter “Sport” in the “validation product tag” field. For the notification message, provide the appropriate inputs, as illustrated in the image below:

-
To implement your notification message, you’ll need to select and complete the three fields highlighted above. This includes a ‘presentation’ method dropdown where you can choose the type of message to display, such as a Banner or Textblock. Multiple options are available to choose from.
-
After selecting the message type, proceed to fill in the message header, which functions as the title of your message. Then, input the message description, which will be displayed below the title. If you prefer to display the heading and description in a standard text format, you can do so here. However, if you wish to get more creative with your message block, we offer a fantastic functionality that allows you to add and format content as desired. To access this feature, navigate to ‘App’ -> ‘Checkoutstride Content page,’ as depicted below:

-
The Content page will appear like this:
- At present, you’ll see a banner indicating that no content has been added. To address this, click on any of the “Add Content” buttons, as shown in the image above.
-
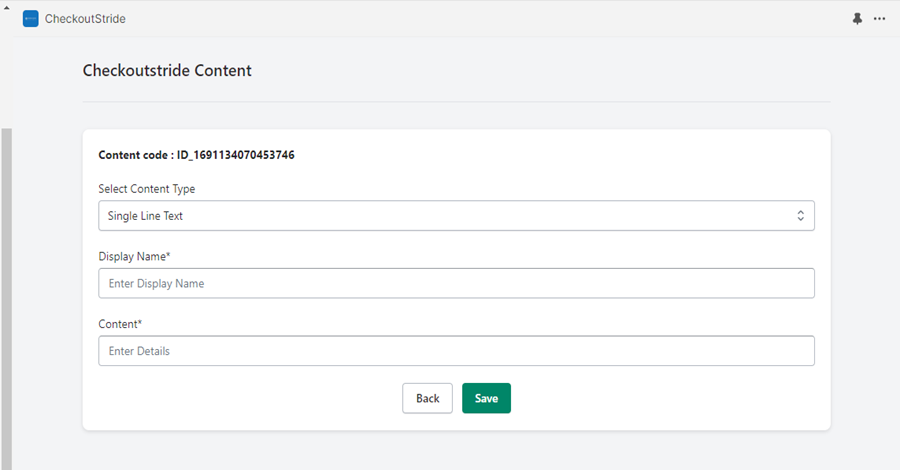
Clicking “Add Content” will take you to a screen where you can create your content, as shown below:
- In this screen, you’ll encounter a dropdown list offering various options to set your content type, such as Single-line, Multi-line, or Rich-text format.
- After selecting your desired content type, provide a display name for your content, which will be visible in the listing screen. Fill in the content in the content box based on your selected option, and then click the save button.
-
You will now be redirected to the Content Management Listing screen, where you can view the content you’ve added, as shown below:
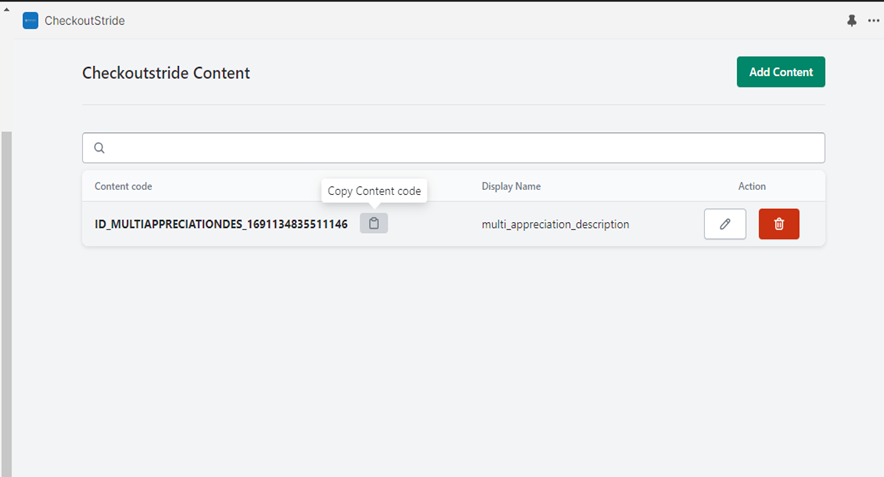
From this listing screen, simply copy the code for your listed content using the highlighted clipboard button. Once copied, go to your Shopify admin ‘Settings’ -> ‘Checkout’ -> ‘Customize profile’ page, where you’ll find our extension block. Click it and paste the content code in your desired location, whether it’s in the heading or description. Both fields are supported, allowing you to Customize the content within your message block. -
Now, let’s move on to the task of adding or checking product tags. Within the Admin panel, navigate to ‘Products,’ as depicted below:

-
Clicking on ‘Products’ will take you to a screen like the one shown below:
-
Select any product from the list to access the product detail page, as shown below:
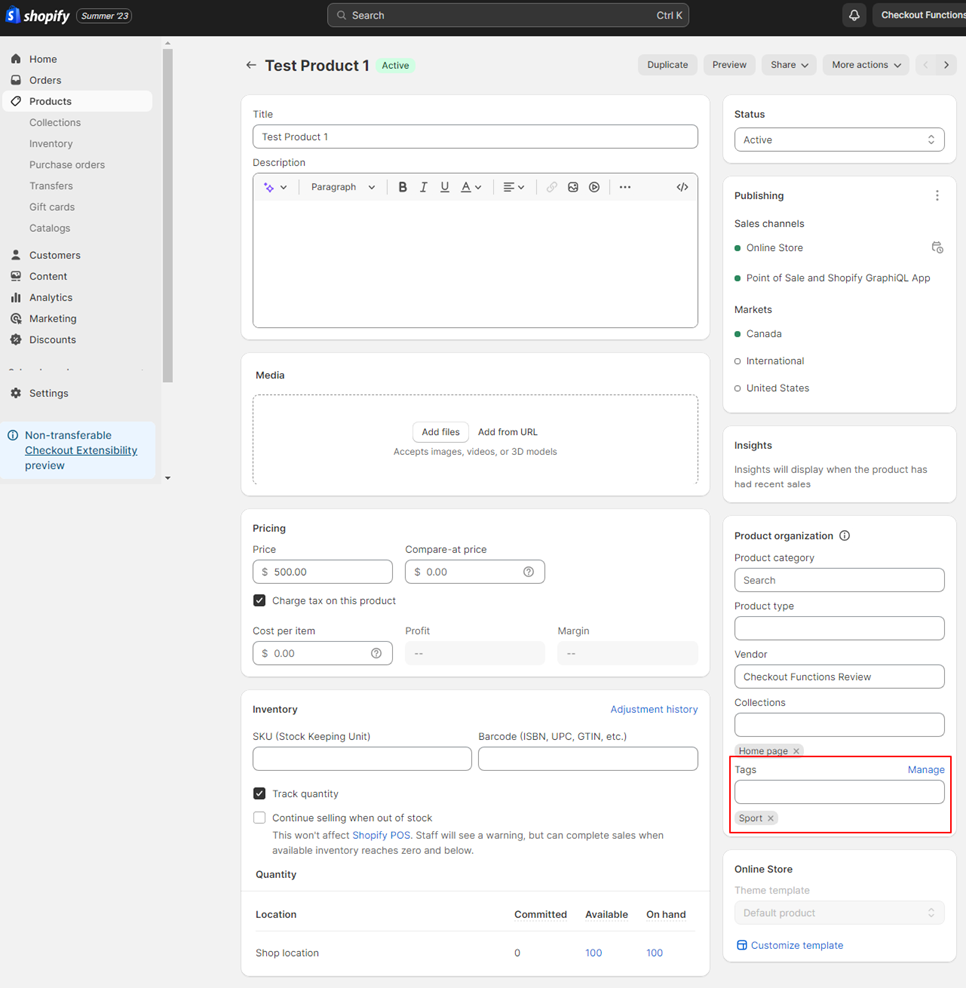
- In the ‘Tags’ section, you’ll notice the “sport” tag, which has already been added. If you wish to include another tag, simply enter it in the “Tags” input box and click “Add tag.”
-
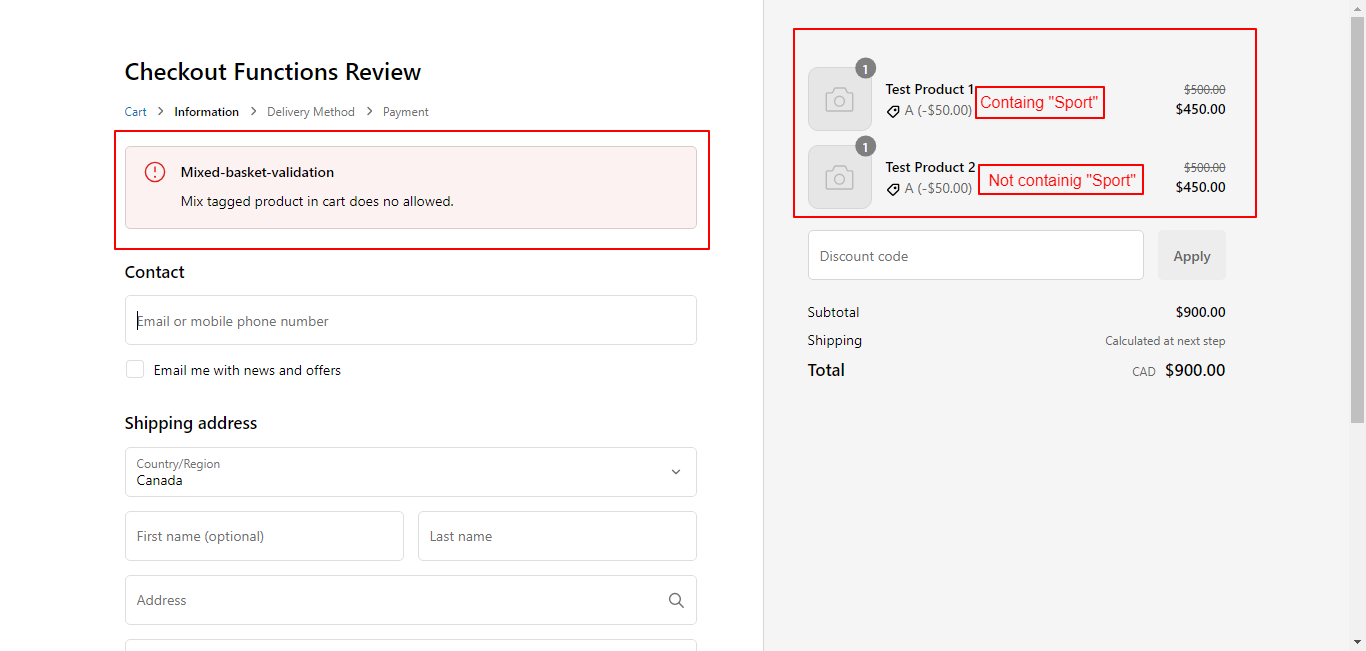
If all the products in the cart have the “Sport” tag, everything is in order. The checkout page will not display a notification message. However, if there are two products in the cart, and only one of them carries the “Sport” tag, a notification message will appear on the checkout page, as illustrated below.